


OID Authentication with Groups from External Table
As more firms seek to consolidate their technology stack while expanding their analytics capabilities, it makes more and more sense to transition your OBIEE 10g analytics solution to Oracle's new 11g framework. Oracle's 11g framework provides, among other things:
- An integrated solution for managing & deploying 11g applications from a single environment (Weblogic and Fusion Middleware)
- A centralized system for configuring security across all your environments
- Integration with Oracle's 11g exadata & exalytics solutions
- A framework for utilizing external web services within your reporting solution
- e.g. Your company seeks to expand its business and enter a new market so you create a report using 11g's mapviewer utilizing Yelp.com's API to aggregate user reviews to determine what services consumers are the unsatisfied with, thus allowing you to quantify new business opportunities and entry points.
But before you can
save the world and generate new business ideas for your company - step 1 is to
deploy the OBIEE 11g application within your company. You've done an analysis
of your company's security policy and determined that user authentication is
stored in Oracle Internet Directory but corresponding reporting groups
are stored in an external database table.
In 11g you can accommodate this security model by deploying two authentication providers: one for OID, and another for the external database table. I've outline the steps below needed to accomplish this task:
Step 1: Configure OID Authentication
To successfully implement an 'OID authentication w/ groups in an external database' security model, you are really completing two separate tasks:
1) Configure OID Authentication
2) Configure external groups authentication
make sure you can log into your 11g Answers environment with users in your OID.
Do not proceed to step 2 until your OID
users can successfully log into the 11g Answers environment.
Step 2: Deploy your Sample
Schema for Groups & Group Members
In your 10g deployment, you probably created an init block that stored a user's groups to the GROUPS session variable. 11g handles user group authentication via Weblogic & Fusion Middleware using an authentication provider similar to the one you created for your OID authentication. The only difference between the OID authentication & the group authentication is instead of hitting OID as the authenticator, we're going to create a BI SQL Group authentication provider that will hit an external database.
Your groups database schema needs to resemble the following data model*:

*
Data model taken from Oracle Fusion Middleware
Security Guide
Groups
table: represents all of the possible groups in your system.
Groupmembers
table: stores all of the users and their corresponding group.
Below
are 2 rudimentary queries you can use to generate the tables but note they
don't utilize any type of indexes, PK/FK relationships, or best practices. I'd
use these for a POC (proof of concept) and once the system is ready to scale,
create model using best practices:
GROUPS
create statement:
CREATE
TABLE USER.GROUPS(
GROUPMEMBERS
VARCHAR2(100 BYTE),
G_NAME
VARCHAR2(100 BYTE),
G_MEMBER
VARCHAR2(100 BYTE)
)
Groupmembers create statement:
CREATE
TABLE USER.GROUPMEMBERS(
GROUPS VARCHAR2(100 BYTE),
G_NAME
VARCHAR2(100 BYTE),
G_DESCRIPTION
VARCHAR2(100 BYTE)
)
Remember
that the BISystemUsers, BIAdministrators, BIConsumers and BIAuthors group must
appear in your external database table!
Step
3: Install
the BISQLGroupProvider authenticator
Using
an external data source for groups within 11g is a new feature that was not
initially available in 11.1.1. Oracle later implemented this feature as an
add-on but since it wasn't part of the core release (11.1.1.4 and earlier),
you're going to have to install the BISQLGroupProvider authenticator before it
will appear as an available provider within your provider tab.
Step
3.1)
Copy
the BISecurityProviders.jar file located in MW_HOME/ORACLE_HOME/bifoundation/security/providers
to the following folder path: MW_HOME/wlserver_10.3/server/lib/mbeantypes
to the following folder path: MW_HOME/wlserver_10.3/server/lib/mbeantypes
Step
3.2)
After
copying the file into the specified location you must restart the
Administration Server to enable the new provider to appear in the list of
available authenticators.
Step
4: Create
the Groups data source in Weblogic
In weblogic (:7001/console/) navigate to :
bifoundation_domain -> Services -> Data sources -> Configuration ->
New -> Generic Data source

Step
4.1) Create a new JDBC source name
Name:
The value of the 'name' field wwill be used in the config.xml file and in
weblogic whenever referring to this data source. For this example, let's use
the name : BIDatabaseGroupDS
JDNI
Name: This value will be used when creating the database adapter for the
virtualized identity store. For this example, let's use: jdbc/BIDatabaseGroupDS

Step
4.2) Specify the database driver
You
will need to identify your database driver before proceeding. If you're using
an Oracle stack w/ an 11g database, then the default specification will
suffice.

Step
4.3) Specify Connection Information
Database
Name: For example, enter: ora11. The
name of the database that you want to connect to.
Host
Name: For example, enter: mymachine.mycompany.com The DNS name or IP address of the
server that hosts the database.
Port:
For example, enter: 1521.
The
port on which the database server listens for connections requests.
Database
User Name: Typically the schema owner of the tables defined in Step 2.

Step
4.4) Test database connection
At
this point you'll be transferred to a screen that ask you to test the
connection using a
SQL
SELECT 1 FROM DUAL
You
need to pass this step before moving on, so an error like:

is
an indication that you've incorrectly configured your data source.
Hopefully,
will you see a 'Connection test succeeded' message like below.

Step 4.5) Deploy the JDBC Data Source to the Admin and Managed Server
After clicking 'Finish' you will need to navigate to : bifoundation_domain - > Services -> Data Sources -> BIDatabaseGroupsDS -> Targets. Check the 'AdminServer' and 'bi_cluster' checkbox to deploy the JDBC Data Source.

Step 5: Create the
BISQLGroupProvider Authentication Provider
5.1) Navigate to Security Realms -> myrealm -> Providers ->
Authentication (as seen below)

5.2) Create a New
Authentication Provider called 'MySQLGroupProvider' using type
'BISQLGroupProvider'

5.3) Re-order the Authentication Provider list so that
MySQLGroupProvider is the first authentication provider on the list

5.4) Create the custom SQL statements needed to generate the user &
corresponding group memberships
Navigate to the 'Provider Specific' tab within your MySQLGroupProvider and populate the SQL Statements as follows (note that you will have to modify these statements if you did not follow the data model in Step 2. Do not remove the '?' from the SQL statement as it is a wild card indicator weblogic populates with a specific value at runtime.
Navigate to the 'Provider Specific' tab within your MySQLGroupProvider and populate the SQL Statements as follows (note that you will have to modify these statements if you did not follow the data model in Step 2. Do not remove the '?' from the SQL statement as it is a wild card indicator weblogic populates with a specific value at runtime.
Query
|
SQL
|
Notes
|
SQL List Groups
|
SELECT
G_NAME FROM GROUPS WHERE G_NAME LIKE ?
|
The
SQL statement used to retrieve group names that match a wildcard. The SQL
statement requires a single parameter for the group name and must return a
resultSet containing matching groups.
|
SQL Group Exists
|
SELECT
G_NAME FROM GROUPS WHERE G_NAME = ?
|
The
SQL statement used to look up a group. The SQL statement requires a single
parameter for the group name and must return a resultSet containing at most a
single record containing the group.
|
SQL
Is Member
|
SELECT
G_MEMBER FROM GROUPMEMBERS WHERE G_NAME = ? AND G_MEMBER = ?
|
The
SQL statement used to look up members of a group. The SQL statement requires
two parameters: a group name and a member or group name. It must return a
resultSet containing the group names that matched.
|
SQL
List Member Groups
|
SELECT
G_NAME FROM GROUPMEMBERS WHERE G_MEMBER = ?
|
The
SQL statement used to look up the groups a user or group is a member of. The
SQL statement requires a single parameter for the username or group name and
returns a resultSet containing the names of the groups that matched.
|
SQL
Get Group Description (if description supported enabled)
|
SELECT
G_DESCRIPTION FROM GROUPS WHERE G_NAME = ?
|
The
SQL statement used to retrieve the description of a group. Only valid if
Descriptions Supported is enabled. The SQL statement requires a single
parameter for the group name and must return a resultSet containing at most a
single record containing the group description.
|
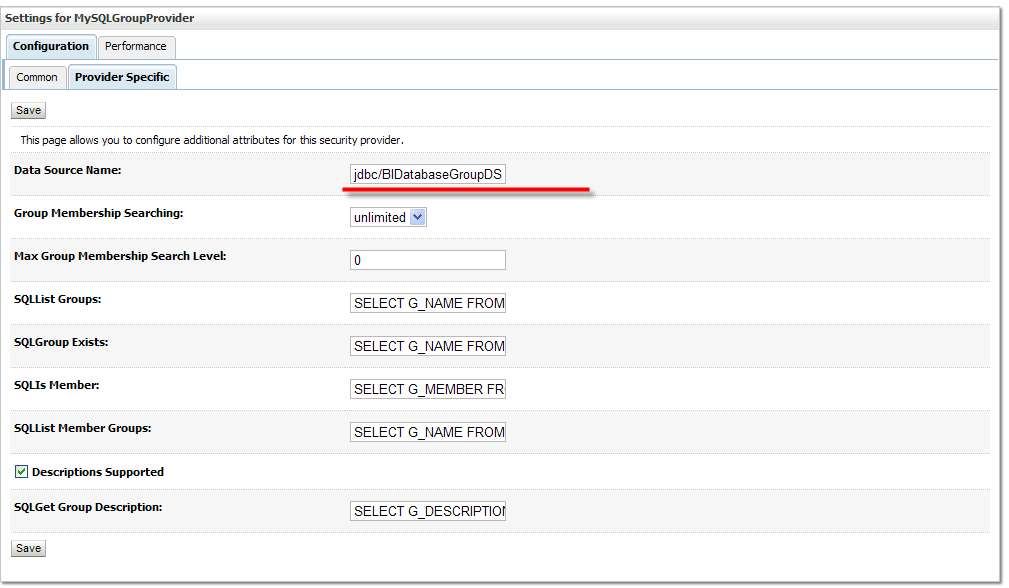
Make the Data Source Name: jdbc/BIDatabaseGroupDS
5.4) Navigate to the 'Common' tab and set the Control Flag to 'Optional'
The JAAS Control flag needs to be set to optional to let weblogic know that even if authentication fails (a user isn't found in the group/groupmembers data model) to continue down the authentication provider list.

Step 6) Create a database adapter for the Virtualized Identity Store
Now we're going to create an XML file which will act as a database adapter to facilitate access to the group/groupmembers data model.
Create an XML file called 'bi_sql_groups_adapter_template.xml' and populate it with the following content:
<?xml version = '1.0' encoding = 'UTF-8'?>
<adapters schvers="303" version="1" xmlns="http://www.octetstring.com/schemas/Adapters" xmlns:adapters="http://www.w3.org/2001/XMLSchema-instance">
<dataBase id="directoryType" version="0">
<root>%ROOT%</root>
<active>true</active>
<serverType>directoryType</serverType>
<routing>
<critical>true</critical>
<priority>50</priority>
<inclusionFilter/>
<exclusionFilter/>
<plugin/>
<retrieve/>
<store/>
<visible>Yes</visible>
<levels>-1</levels>
<bind>true</bind>
<bind-adapters/>
<views/>
<dnpattern/>
</routing>
<pluginChains xmlns="http://xmlns.oracle.com/iam/management/ovd/config/plugins">
<plugins>
<plugin>
<name>VirtualAttribute</name>
<class>oracle.ods.virtualization.engine.chain.plugins.virtualattr.VirtualAttributePlugin</class>
<initParams>
<param name="ReplaceAttribute" value="uniquemember={cn=%uniquemember%,cn=Users,dc=trusted,dc=oracle,dc=dev}"/>
</initParams>
</plugin>
</plugins>
<default>
<plugin name="VirtualAttribute"/>
</default>
<add/>
<bind/>
<delete/>
<get/>
<modify/>
<rename/>
</pluginChains>
<driver>oracle.jdbc.driver.OracleDriver</driver>
<url>%URL%</url>
<user>%USER%</user>
<password>%PASSWORD%</password>
<ignoreObjectClassOnModify>false</ignoreObjectClassOnModify>
<includeInheritedObjectClasses>true</includeInheritedObjectClasses>
<maxConnections>10</maxConnections>
<mapping>
<joins/>
<objectClass name="groupofuniquenames" rdn="cn">
<attribute ldap="cn" table="GROUPMEMBERS" field="G_NAME" type=""/>
<attribute ldap="description" table="GROUPMEMBERS" field="G_NAME" type=""/>
<attribute ldap="uniquemember" table="GROUPMEMBERS" field="G_MEMBER" type=""/>
</objectClass>
</mapping>
<useCaseInsensitiveSearch>true</useCaseInsensitiveSearch>
<connectionWaitTimeout>10</connectionWaitTimeout>
<oracleNetConnectTimeout>0</oracleNetConnectTimeout>
<validateConnection>false</validateConnection>
</dataBase>
</adapters>
The bold text indicates fields that you will need to customize based on your requirements. Let's take this 1 step at a time.
First) <param name="ReplaceAttribute" value="uniquemember={cn=%uniquemember%,cn=Users,dc=trusted,dc=oracle,dc=dev}"/> needs to be the User Base DN you specified in Step 2 of Part 1 in my OBIEE 11g OID installation guide
If, for example, your User Base DN is dc=trusted,dc=oracle,dc=com , then you would need to modify the XML above to be:
<param name="ReplaceAttribute" value="uniquemember={cn=%uniquemember%,dc=trusted,dc=oracle,dc=com}"/>
The %uniquemember% field is a placeholder which gets populated via the SQL statements in your Group Authentication provider.
Second)
<attribute ldap="cn" table="GROUPMEMBERS" field="G_NAME" type=""/>
<attribute ldap="description" table="GROUPMEMBERS" field="G_NAME" type=""/>
<attribute ldap="uniquemember" table="GROUPMEMBERS" field="G_MEMBER" type=""/>
GROUPMEMBERS needs to be replaced with the table you created which stores your group members via the group/groupmembers data model in Step 2.
Step 7) Bind the adapter to Weblogic using the Weblogic Scripting Tool (WLST)
7.1) Copy the bi_sql_groups_adapter_template.xml to: ../../oracle_common/modules/oracle.ovd_11.1.1/templates/
7.2) Confirm key environmental variables are set
- ORACLE_HOME=<MW_HOME>/Oracle_BI1
- WL_HOME=<MW_HOME>/wlserver_10.3/
- JAVA_HOME=<MW_HOME>/jdk160_24/
7.3) Bind the adapter:
Navigate to /oracle_common/bin and run the following command:
libovdadapterconfig -adapterName MySQLGroupProvider -adapterTemplate bi_sql_groups_adapter_template.xml -host hostname -port 7001 -userName weblogic -domainPath C:\app\11g\mw_home\user_projects\domains\bifoundation_domain\ -dataStore DB -root cn=Staff,cn=Users,dc=trusted,dc=oracle,dc=dev -contextName default -dataSourceJNDIName jdbc/BIDatabaseGroupDS
Parameter
|
Value
|
host
|
Represents
the hostname (ip address) of your weblogic server
|
port
|
Represents
the port of your weblogic server , usually 7001
|
username
|
Represents
your weblogic administrator account
|
adapterName
|
Represnets
the name of the group authentication provider
|
domainPath
|
Represents
the path to your bifoundation_domain folder
|
root
|
Represents
the User Base DN you specified in your in your
bi_sql_groups_adapter_template.xml , excluding the %uniquemember% component
|
dataSourceJNDIName
|
represents
the JDNI name of your Groups Datasource
|
The command should execute without any error.
7.4) Restart admin server & managed services (bi_server)
Step 8) Validate Changes by Creating a Custom Application Role
We're going to create a custom application role based on one of our custom groups to confirm that the Group Authenticator works.
8.1) Create an Application Role
From FMW Enterprise Manager (:7001/em/) -> farm_bifoundation_domain -> Business Intelligence -> coreapplication -> Right Click -> Security -> Application Roles -> Create
Click the Add button and select a Group from your Group Authenticator. In this example, I will add a group called 'ES Worker':

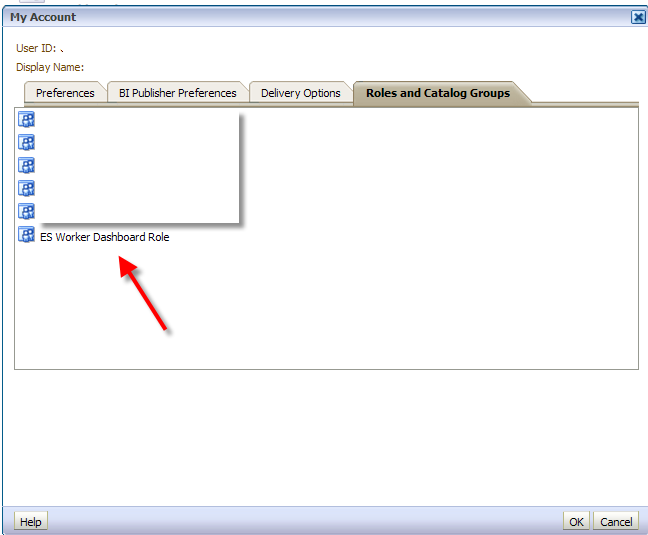
8.2) Login to Answers as a user of the group application role you
just created
Navigate
to My Account -> Roles and Catalog Groups
No comments:
Post a Comment