Showing posts with label INSTALL. Show all posts

Thursday, February 4, 2016

Red Hat Linux 5 - Installation

Red Hat Linux 5 - Installation
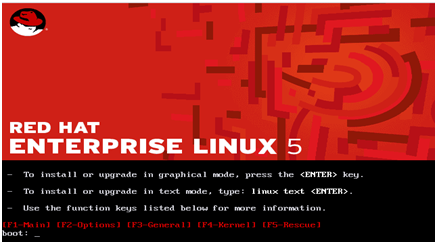
Step 1 – Insert the Red Hat Linux DVD into the DVD-drive of your computer. As soon as the following screen pops up, press ‘Enter’ to install Red Hat Enterprise Linux (RHEL) through GUI mode.
http://tutmaster.com/wp-content/uploads/2011/06/untitled.bmp
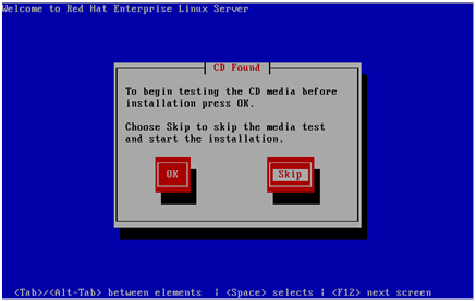
Step 2– RHEL installer would then prompt you conduct a check as to whether the CD media from which you’re installing is functioning correctly or not. Choose ‘Skip’, press enter and the installation would begin.
http://tutmaster.com/wp-content/uploads/2011/06/untitled1.bmp
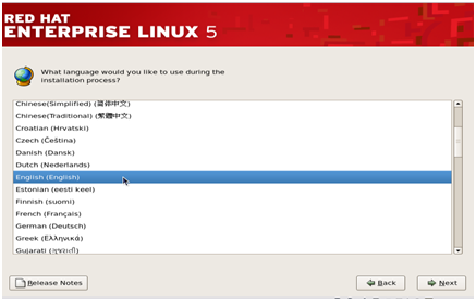
Step 3– Next, we need to select the language- English or any other language as per your preference, and then press ‘Next’ .
http://tutmaster.com/wp-content/uploads/2011/06/untitled2.bmp

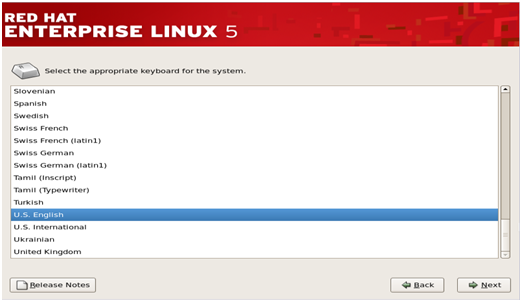
Step 4– In this step, the RHEL installer would ask you about the appropriate type of keyboard for the system. We take the ‘US English’ keyboard, you can pick any other option depending on the type of your keyboard. Then press ‘Next’ to move to the next step.
http://tutmaster.com/wp-content/uploads/2011/06/untitled3.bmp

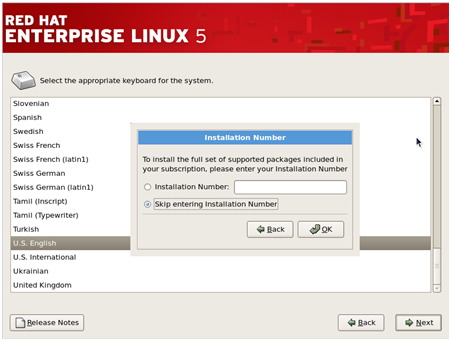
Step 5– Next, the installer would ask for an ‘installation number’ if you wish to install full set of Red Hat functionalities. Enter the installation number and press ‘OK’ if you have an officially licensed installation number(for corporate clients that buy Red Hat’s backup support and full features).

Others can select ‘Skip entering installation number’ and press ‘OK’ to proceed. RHEL would show a warning message, press ‘Skip’ in it to continue.
http://tutmaster.com/wp-content/uploads/2011/06/untitled4.bmp
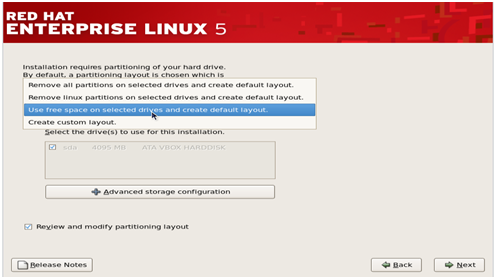
Step 6– The Red Hat installer would then require you to create partitions in your computer’s hard disk for the installation. You can do it in four ways but the simplest way is to select ‘Use free space on selected drives and create default layout’ as this option will not affect any other OS residing in your system.
Check the ‘review and modify portioning layout’ to create partitions and click next.
http://tutmaster.com/wp-content/uploads/2011/06/untitled5.bmp

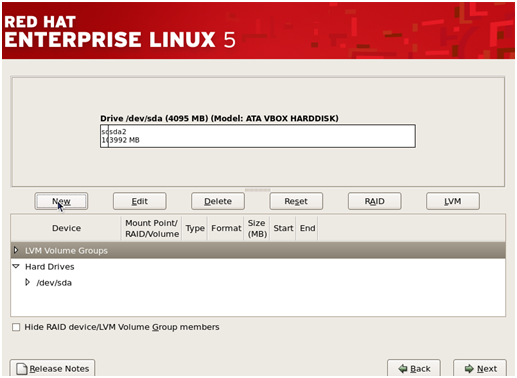
Step 7– In this step you must create the required system partitions and mount points such as ‘/boot’, ‘/home’, ‘swap’ etc which are required for the Linux’s proper functioning.
To create different partitions such as /home, /var etc, click on ‘New’ to create the partitions.
http://tutmaster.com/wp-content/uploads/2011/06/untitled6.bmp
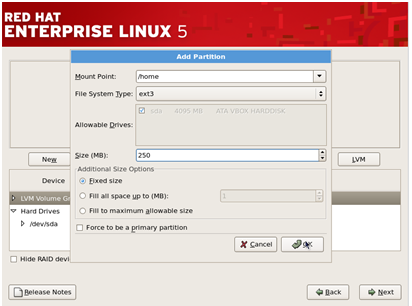
Then, select /home in the mount point and choose ‘ext3’ as the file system and give the desired size for it and then click ‘OK’. Similarly also create /boot and /var.
http://tutmaster.com/wp-content/uploads/2011/06/untitled7.bmp
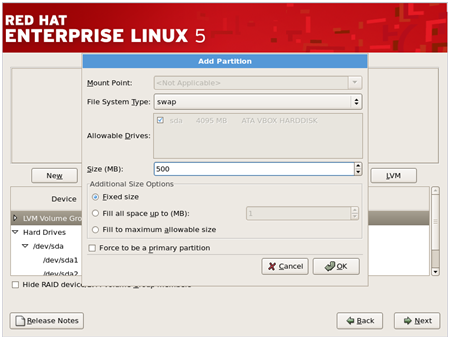
Also, create a swap partition by clicking on ‘New’ and then choosing the filesystem as ‘swap’ and also give the size of Swap partition.(Usually size of swap partition SHOULD BE twice the size of RAM available to the system but you can keep its size less than that too)
http://tutmaster.com/wp-content/uploads/2011/06/untitled8.bmp
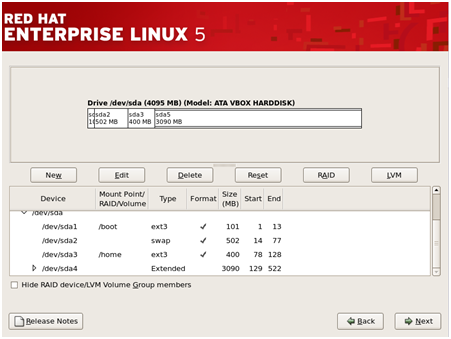
Once you have made all the desired partitions and given their mount points, click ‘Next’ to continue installation.
http://tutmaster.com/wp-content/uploads/2011/06/untitled9.bmp
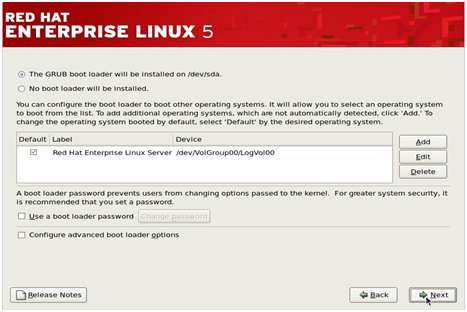
Step 8– This step pertains to the default OS that will be loaded by the GRUB loader
http://tutmaster.com/wp-content/uploads/2011/06/untitled10.bmp
(Note- If you have multiple Operating Systems installed, you would see multiple options here and you have to check in front of the OS name that you want to be loaded by default when the system is started.)
Click ‘Next’ to continue.
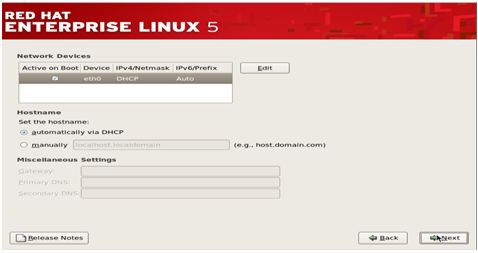
Step 9– This step pertains to the network settings of the Linux system that you are going to install. You can select the Ethernet devices through which the system would communicate with other devices in the network.
You can also provide the hostname, Gateway address and DNS address to the system during this step. (However it’s better to adjust these settings once the system has been fully installed).
http://tutmaster.com/wp-content/uploads/2012/11/Untitled12.png
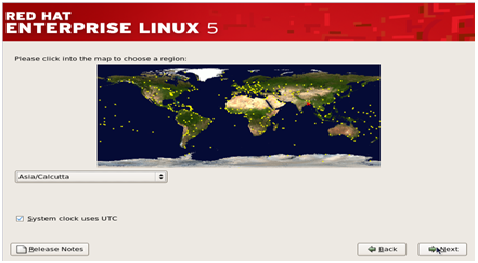
Step 10– The next step is to adjust the system clock to your particular time zone. Select your time zone and then click ‘Next’.
http://tutmaster.com/wp-content/uploads/2012/11/Untitled13.png
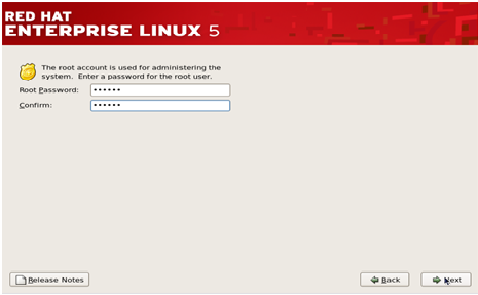
Step 11 – This is a very important step that deals with the root(super-user) password for the system . Type the password and confirm it and then click next.
http://tutmaster.com/wp-content/uploads/2012/11/Untitled14.png
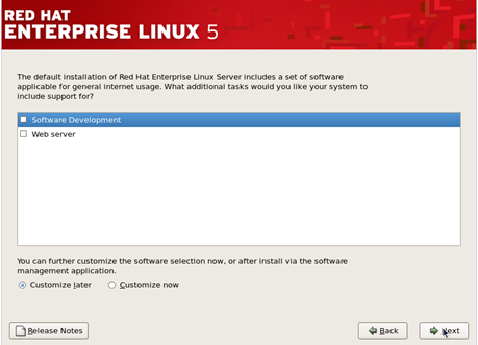
Step 12 – The RHEL installer would then prompt you about if you wish to install some extra ‘Software Development’ or ‘Web Server’ features. By default, keep it at ‘Customize later’ and press ‘Next’.
http://tutmaster.com/wp-content/uploads/2012/11/Untitled15.png
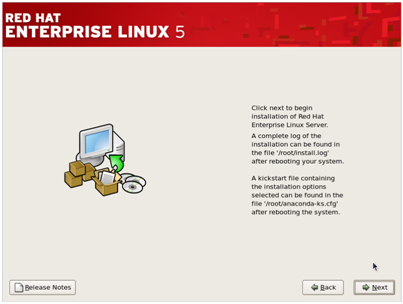
 Step 13– This next step will initiate the installation of Red Hat Linux, press ‘Next’ to begin the process.
http://tutmaster.com/wp-content/uploads/2012/11/Untitled16.png
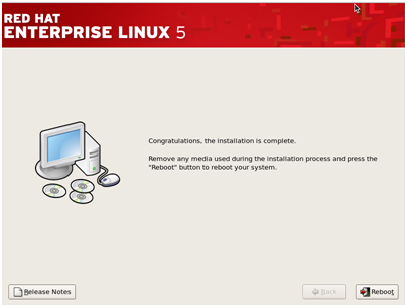
Step 14– Upon the completion of installation you should the following screen. Press Reboot and you’d be ready to use your newly installed Red Hat Linux OS.
http://tutmaster.com/wp-content/uploads/2012/11/Untitled17.png
POST INSTALLATION CONFIGURATIONS
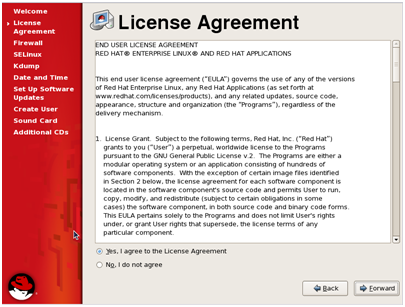
1. Accept the Red Hat License agreement and click ‘Forward.
http://tutmaster.com/wp-content/uploads/2012/11/Untitled18.png
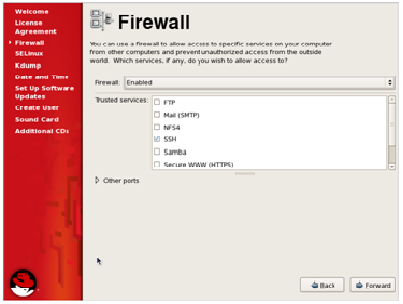
2. The next step is regarding the configuration of the Firewall. You can Enable or Disable the firewall according to your preferences and then click ‘Forward’.
http://tutmaster.com/wp-content/uploads/2012/11/Untitled19.png
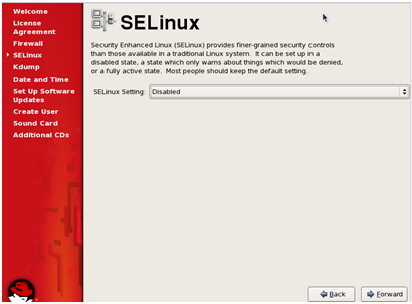
3. Next step is about the configuration of another security tool- SE Linux. By default you should keep it ‘Disabled’ unless you’re working with very secure information.
http://tutmaster.com/wp-content/uploads/2012/11/Untitled20.png
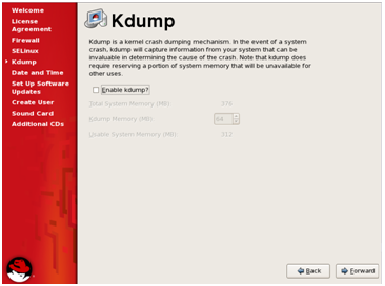
4. You can also choose to configure the Kdump, that stores information about system crashes if your system fails but uses valuable disk space. By default don’t enable it.
http://tutmaster.com/wp-content/uploads/2012/11/Untitled21.png
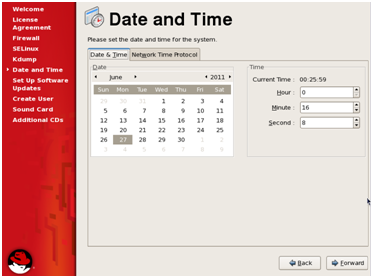
5. Next, adjust the time and date settings, and then click ‘Forward’.
http://tutmaster.com/wp-content/uploads/2012/11/Untitled22.png
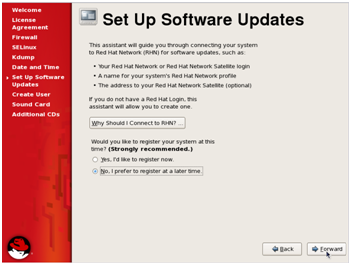
6. The next step is for software updates from Red Hat, at this point you should skip the registration and register at a later time and then click ‘Forward’.
http://tutmaster.com/wp-content/uploads/2012/11/Untitled23.png
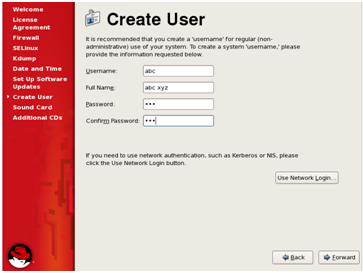
7. This step is to create a non-admin user for the system. Enter the details and click ‘Forward’.
http://tutmaster.com/wp-content/uploads/2012/11/Untitled24.png
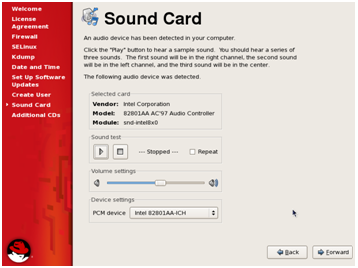
8. This step is about configuration of your Sound Card, choose a sound device and then click ‘Forward’.
http://tutmaster.com/wp-content/uploads/2012/11/Untitled25.png
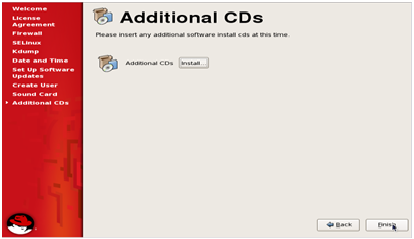
9. Click ‘Forward’ to complete the configurations and start using your Red Hat Linux OS.
http://tutmaster.com/wp-content/uploads/2012/11/Untitled26.png
(Note- On clicking ‘Finish’ the system would require a reboot if you have made changes to the configurations of Firewall or SE Linux.)
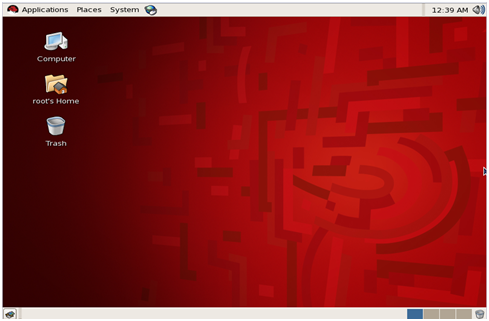
Your Red Hat Linux OS is now all installed and configured, ready to be used. Good luck using and exploring various features of Red Hat Linux.
http://tutmaster.com/wp-content/uploads/2012/11/Untitled27.png

Windows Server 2008 Installation

Windows Server 2008 Installation
To use Windows Server 2008 you need to meet the following hardware requirements:
Component
Requirement
Processor
• Minimum: 1GHz (x86 processor) or 1.4GHz (x64 processor) • Recommended: 2GHz or faster Note: An Intel Itanium 2 processor is required for Windows Server 2008 for Itanium-based Systems
Memory
• Minimum: 512MB RAM • Recommended: 2GB RAM or greater • Maximum (32-bit systems): 4GB (Standard) or 64GB (Enterprise and Datacenter) • Maximum (64-bit systems): 32GB (Standard) or 2TB (Enterprise, Datacenter and Itanium-based Systems)
Available Disk Space
• Minimum: 10GB • Recommended: 40GB or greater Note: Computers with more than 16GB of RAM will require more disk space for paging, hibernation, and dump files
Drive
DVD-ROM drive
Display and Peripherals
• Super VGA (800 x 600) or higher-resolution monitor • Keyboard • Microsoft Mouse or compatible pointing device
Follow this procedure to install Windows Server 2008:
1. Insert the appropriate Windows Server 2008 installation media into your DVD drive. If you don’t have an installation DVD for Windows Server 2008, you can download one for free from Microsoft’s Windows 2008 Server Trial website.
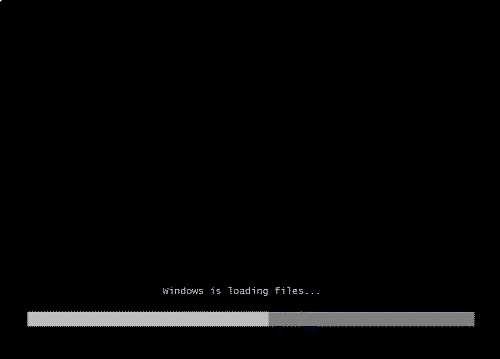
2. Reboot the computer.
C:\Users\Administrator\Desktop\2008\01.gif

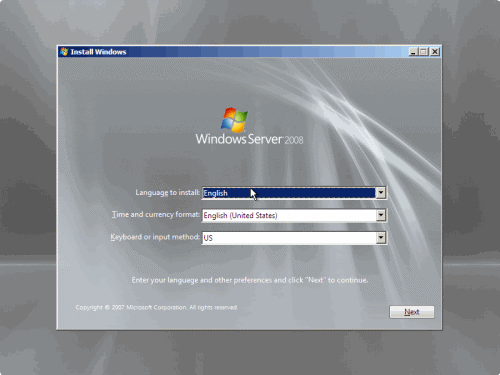
3. When prompted for an installation language and other regional options, make your selection and press Next.
C:\Users\Administrator\Desktop\2008\02.gif
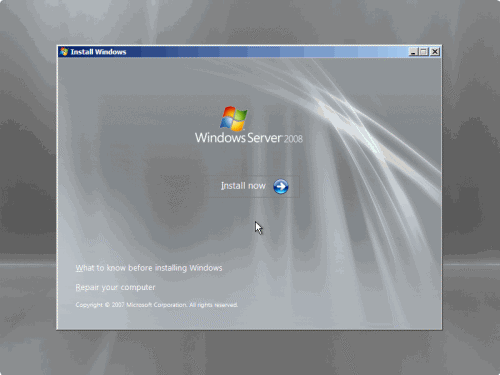
 4. Next, press Install Now to begin the installation process.
 C:\Users\Administrator\Desktop\2008\03.gif
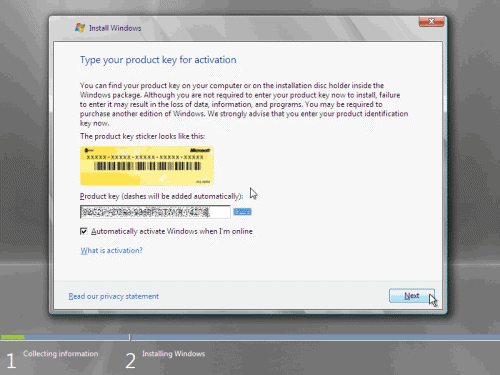
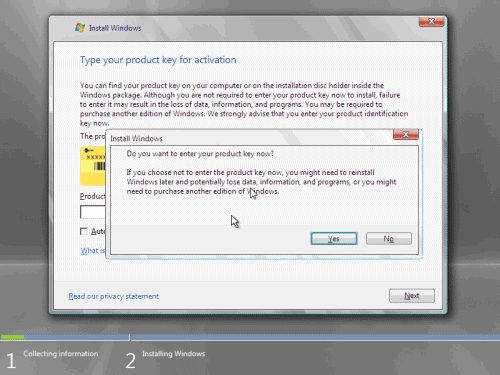
5. Product activation is now also identical with that found in Windows Vista. Enter your Product ID in the next window, and if you want to automatically activate Windows the moment the installation finishes, click Next.
C:\Users\Administrator\Desktop\2008\04.gif

If you do not have the Product ID available right now, you can leave the box empty, and click Next. You will need to provide the Product ID later, after the server installation is over. Press No.
C:\Users\Administrator\Desktop\2008\05.gif

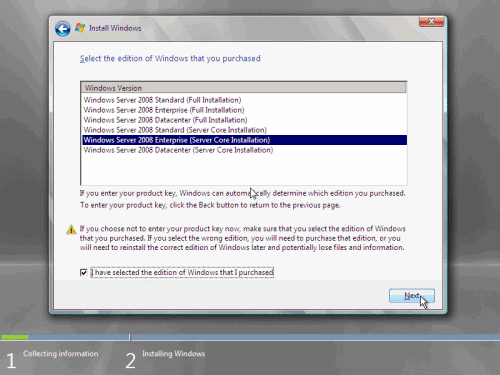
6. Because you did not provide the correct ID, the installation process cannot determine what kind of Windows Server 2008 license you own, and therefore you will be prompted to select your correct version in the next screen, assuming you are telling the truth and will provide the correct ID to prove your selection later on.
C:\Users\Administrator\Desktop\2008\06.gif

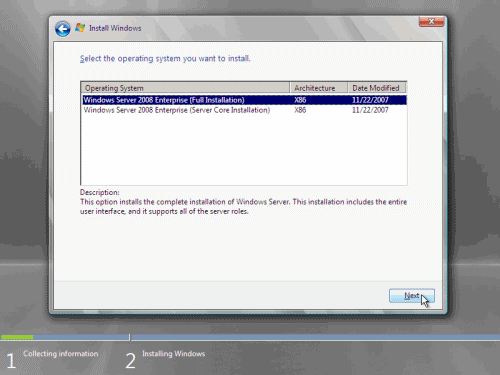
7. If you did provide the right Product ID, select the Full version of the right Windows version you’re prompted, and click Next.
C:\Users\Administrator\Desktop\2008\07.gif

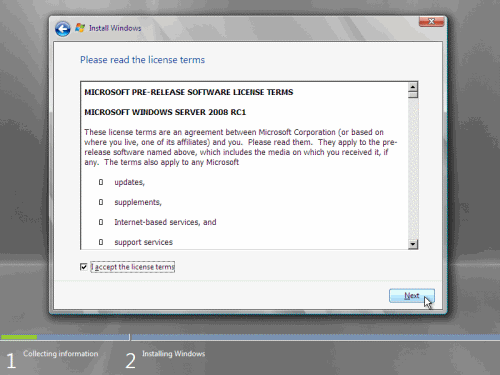
8. Read and accept the license terms by clicking to select the checkbox and pressing Next.

C:\Users\Administrator\Desktop\2008\08.gif

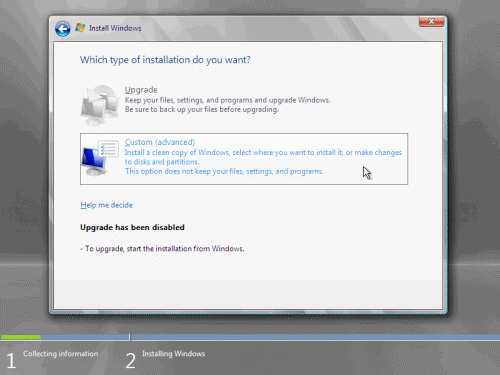
9. In the “Which type of installation do you want?” window, click the only available option – Custom (Advanced).
C:\Users\Administrator\Desktop\2008\09.gif


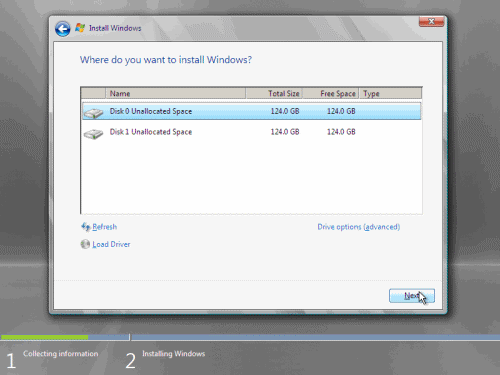
10. In the “Where do you want to install Windows?”, if you’re installing the server on a regular IDE hard disk, click to select the first disk, usually Disk 0, and click Next.

C:\Users\Administrator\Desktop\2008\10.gif

If you’re installing on a hard disk that’s connected to a SCSI controller, click Load Driver and insert the media provided by the controller’s manufacturer.
If you must, you can also click Drive Options and manually create a partition on the destination hard disk.

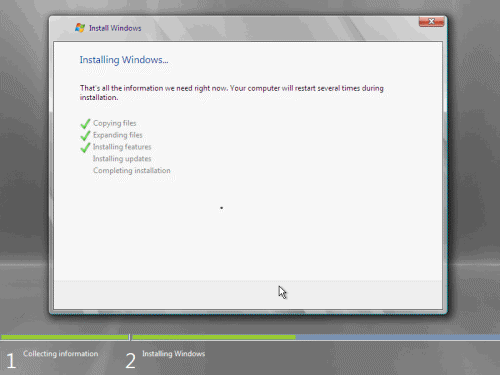
11. The installation now begins, and you can go and have lunch. Copying the setup files from the DVD to the hard drive only takes about one minute. However, extracting and uncompressing the files takes a good deal longer. After 20 minutes, the operating system is installed. The exact time it takes to install server core depends upon your hardware specifications. Faster disks will perform much faster installs… Windows Server 2008 takes up approximately 10 GB of hard drive space.

C:\Users\Administrator\Desktop\2008\11.gif

The installation process will reboot your computer, so, if in step #10 you inserted a floppy disk (either real or virtual), make sure you remove it before going to lunch, as you’ll find the server hanged without the ability to boot (you can bypass this by configuring the server to boot from a CD/DVD and then from the hard disk in the booting order on the server’s BIOS)

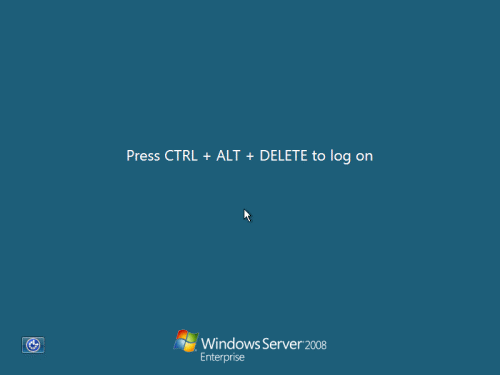
12. Then the server reboots you’ll be prompted with the new Windows Server 2008 type of login screen. Press CTRL+ALT+DEL to log in.

C:\Users\Administrator\Desktop\2008\12.gif
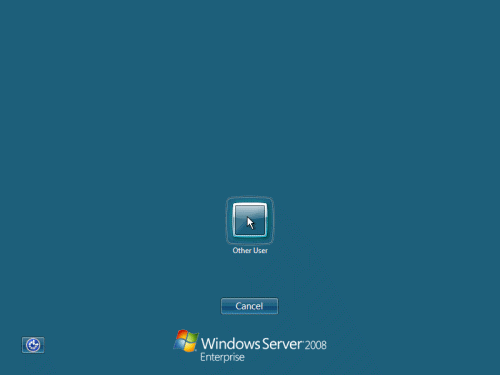
13. Click on Other User.
C:\Users\Administrator\Desktop\2008\13.gif

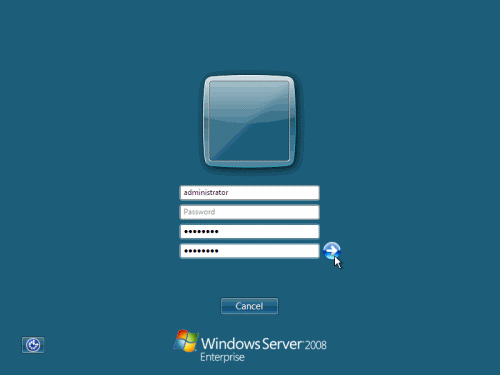
14. The default Administrator is blank, so just type Administrator and press Enter.

C:\Users\Administrator\Desktop\2008\14.gif
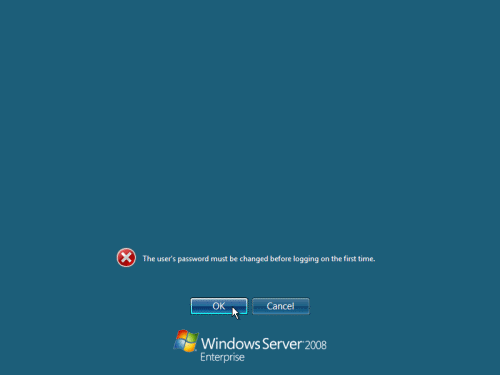
15. You will be prompted to change the user’s password. You have no choice but to press Ok.
C:\Users\Administrator\Desktop\2008\15.gif

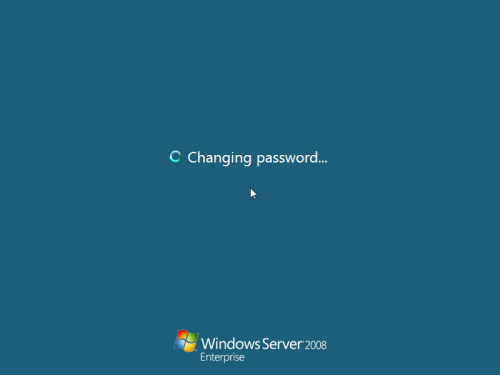
16. In the password changing dialog box, leave the default password blank (duh, read step #15…), and enter a new, complex, at-least-7-characters-long new password twice. A password like “topsecret” is not valid (it’s not complex), but one like “T0pSecreT!” sure is. Make sure you remember it.

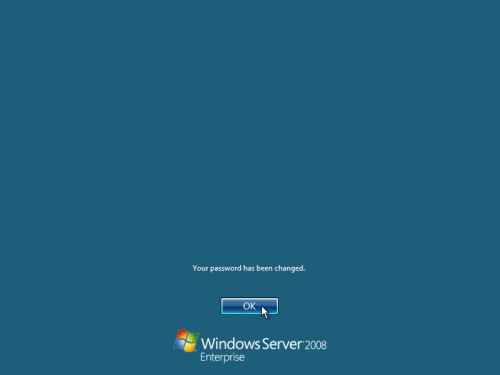
C:\Users\Administrator\Desktop\2008\16.gif

17. Someone thought it would be cool to nag you once more, so now you’ll be prompted to accept the fact that the password had been changed. Press Ok.

C:\Users\Administrator\Desktop\2008\17.gif

C:\Users\Administrator\Desktop\2008\18.gif
18. Finally, the desktop appears and that’s it, you’re logged on and can begin working. You will be greeted by an assistant for the initial server configuration, and after performing some initial configuration tasks, you will be able to start working.

Red Hat Linux 7.0 installation (64 bit)

Red Hat Linux 7.0 installation (64 bit)
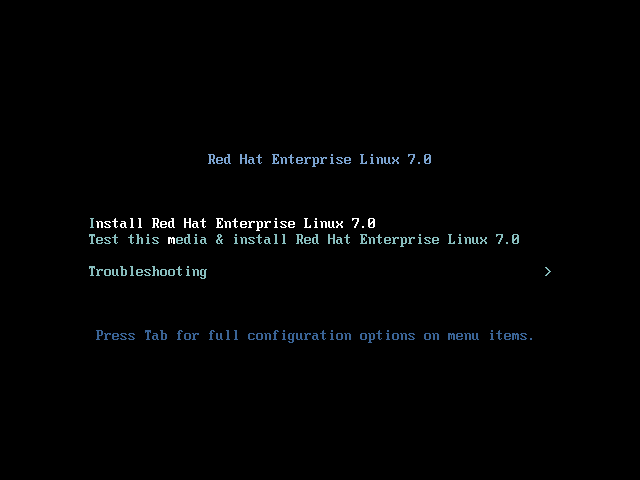
Once you insert and boot your machine with the RHEL DVD, you will get the below screen. Select "Install Red Hat Enterprise Linux 7.0" and Press "Enter".

https://blogger.googleusercontent.com/img/b/R29vZ2xl/AVvXsEhibiIySmETih8PX1HMfxYUgFep5l9VVG3DHtH-rUms8d1mqAhKAfq9elLOMjyCm_NyZuj-ZOa9HRGxDxA6AFSW_eYUZNSM2b7FT3SVLMRLC6Ppgxm7jTrALYwyIKneP7cNPT9Ii1ASWW4/s1600/1.png

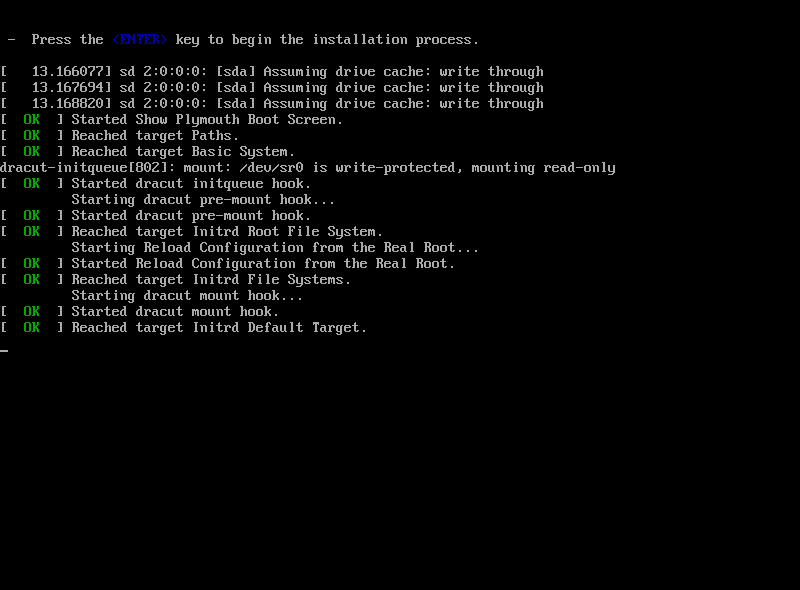
As you see the installation process is initiated

https://blogger.googleusercontent.com/img/b/R29vZ2xl/AVvXsEg1KwMi04RQpTzVD_Dv6jmoyppbyWZLPSb0pv7ocECwbfPRzNa2CqishrU7RavFPnjhyphenhyphenC7M71pmQd6B3JtgJInTIWebl0aUqRJ3ZlIm3xSsBlQE6XZ892n128xkkQolwXDXDd956B77Nvo/s1600/2.png

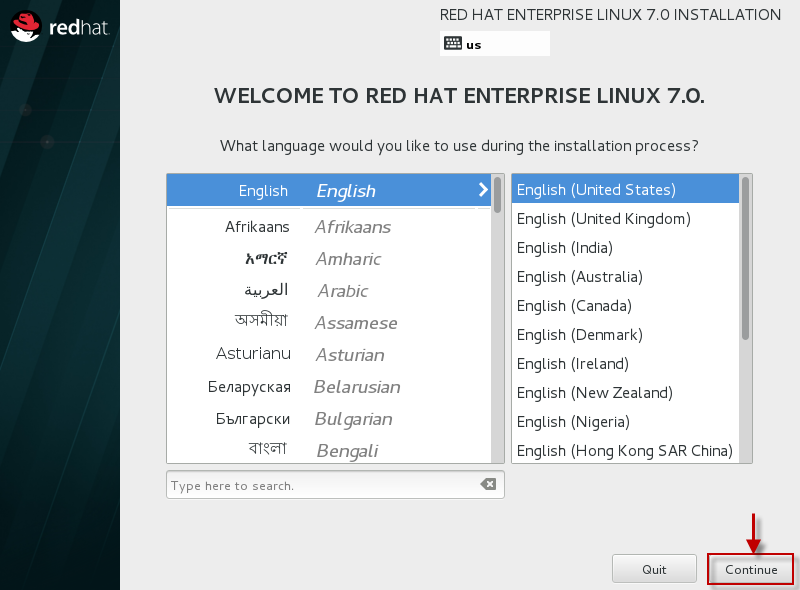
Select the Language preference

https://blogger.googleusercontent.com/img/b/R29vZ2xl/AVvXsEjZHoD5TXPcioRF2_w_J_Vl8aSfzGFy60Po9OM8TKOCk9Kb617Eykk6NZKNoIwjh2qUvIbwjXt6cr5IR6AnA2i2iV8blnwpJDdrHZjtvn8YRzwmTFprqCnX8MF5Wq9BKM01IIAeqaK0pqU/s1600/3.png

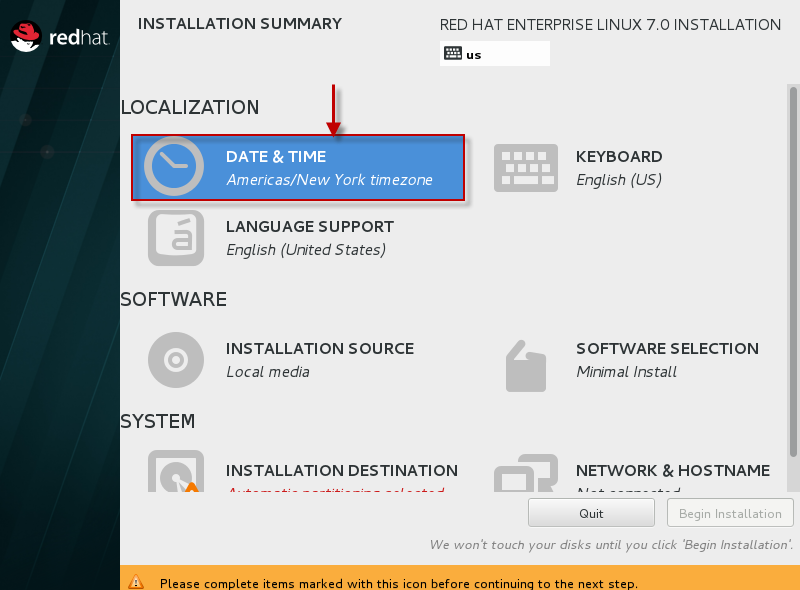
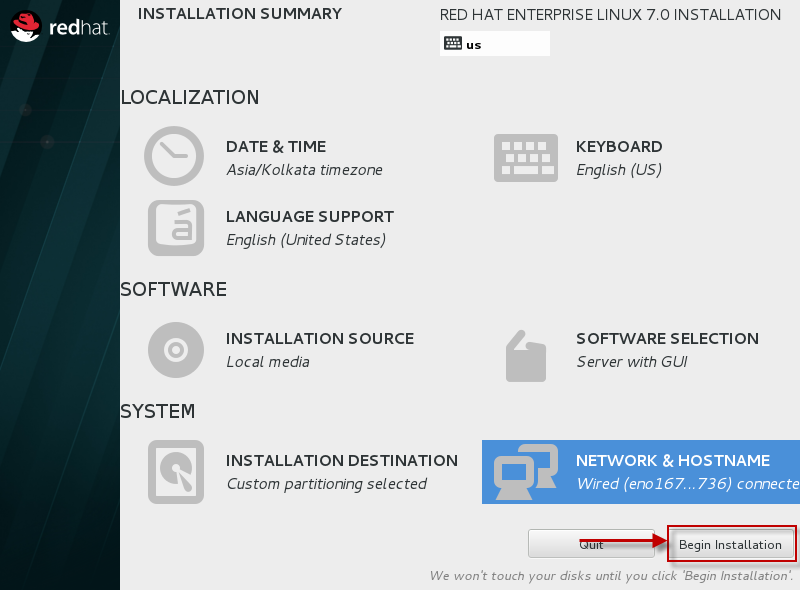
The Next screen contains almost all the configuration which has to be performed for the installation. Since we have already selected our Language and Keyboard preferences, we can skip that step here.

Lets start by setting the Date and Time

https://blogger.googleusercontent.com/img/b/R29vZ2xl/AVvXsEh3b51JKhvyw_M8ZDm8PH0nIVvtuVqNp7XVEqnYcW9Sgir7oKTnV6ByU5jCUGAJ57x3dGPw6__Rb4w7INgPsH6_CbnB_kfzvKX-TbJNOAYuRvMmAV6plqGLKH_Jqyqg9DThtT_8Jen9FKA/s1600/4.png

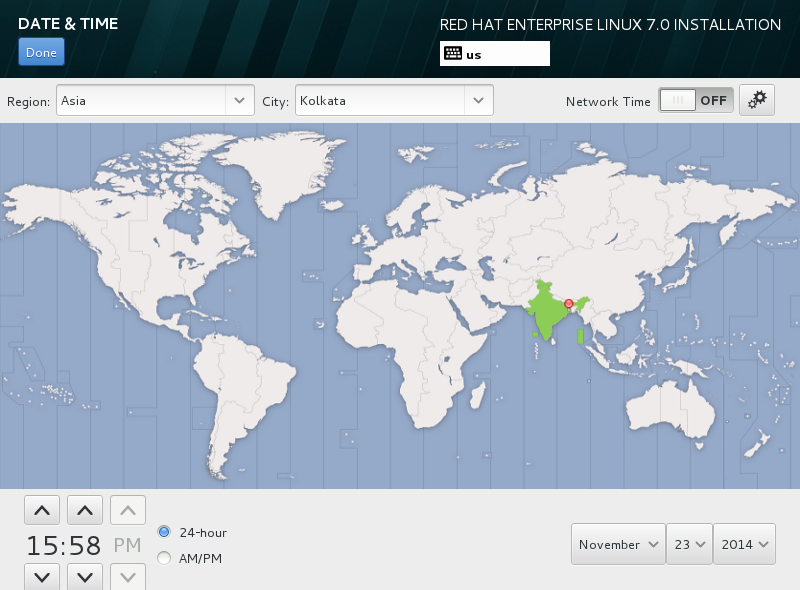
Select your Location as for me it is Asia/Kolkatta

https://blogger.googleusercontent.com/img/b/R29vZ2xl/AVvXsEidsDYG7d9dPOxRyIu8XVEhR9hkFiA4Oje5Pt8LWYRxoBm-R8OnmbeFjq951khs1WUy80YHNoY3-DShrtn2X3VplH0FUl02-6QD5Rv6E2-nCpLIVaoaftP9GYvJidJgPnk6UP_57hvn5pU/s1600/5.png

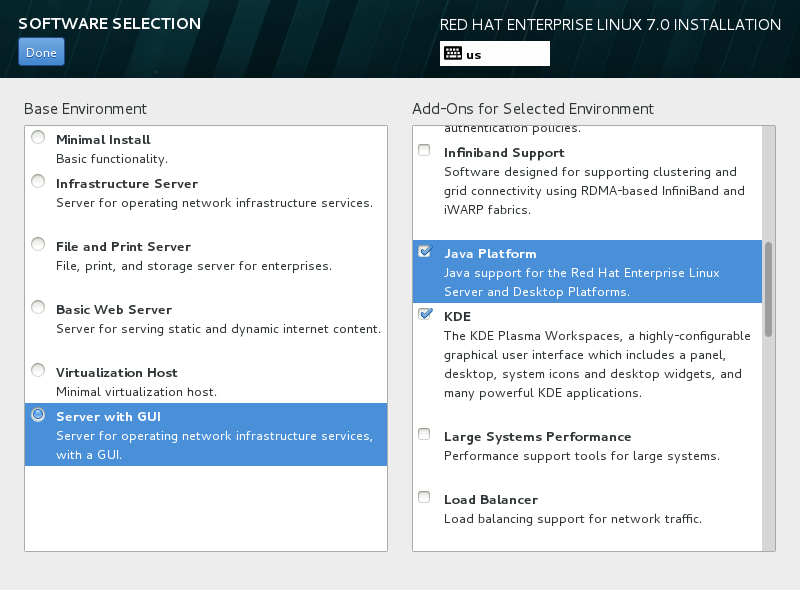
Next we will select the packages which we want to install. So Select "Software Installation" which will lead you to the below screen. In my case I will install the "Base Installation" package having "Server with GUI" and in case you want to add any extra Add On, you can select the same from the left panel as shown below.

https://blogger.googleusercontent.com/img/b/R29vZ2xl/AVvXsEhkc-6VJsi2_jsV_ZjJbaF9w5shAUuzUNjNvUKDCJID6m1YK_m80lKc5I4hei7qRBgDQP49Q8skQgn1yUGCgs6ZY3vrBPHyybEKsjnpWr0OVXnhLQnpRvFA1sF4ouK1cRcWUompklYmQ0s/s1600/6.png

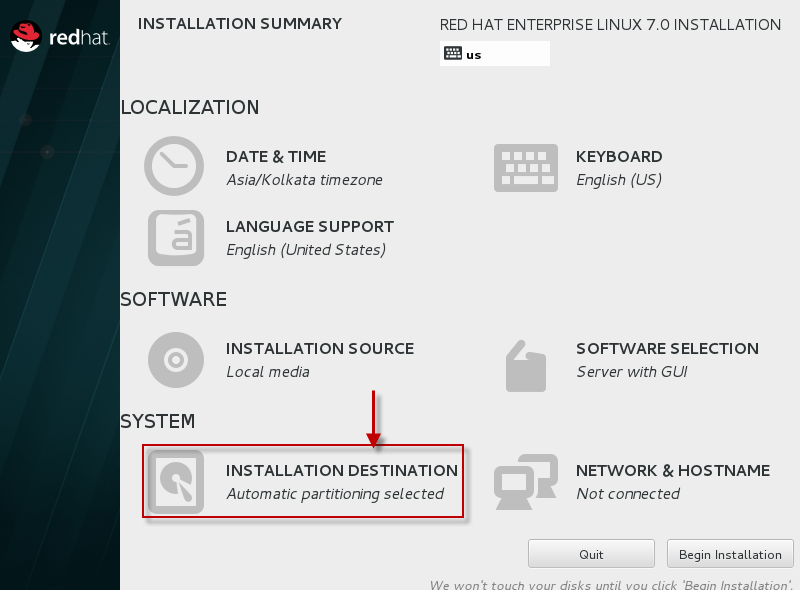
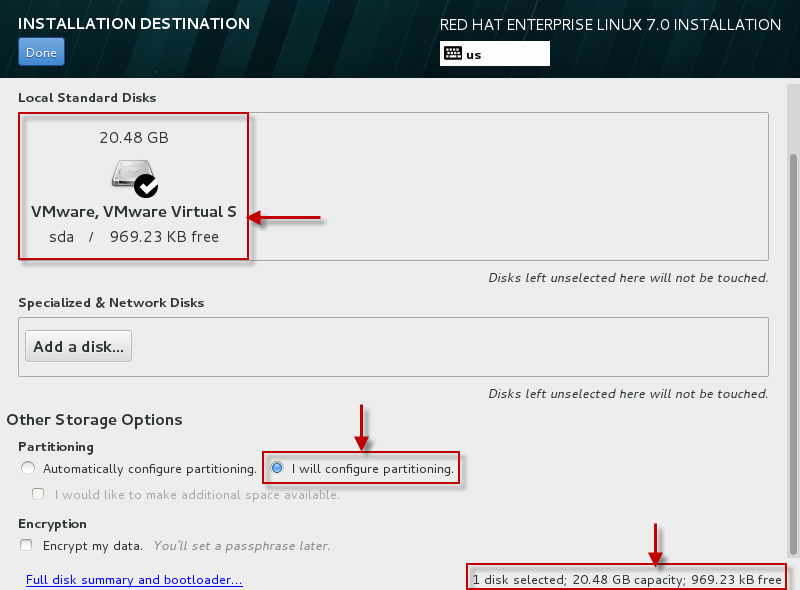
Next we need to configure partitions. So select "Installation Destination"

https://blogger.googleusercontent.com/img/b/R29vZ2xl/AVvXsEhkulNEYM0ysrbfQ5JKMRxYZb9O10dEQm82Y5jrcJVyR7hSFa2Pl4z1tK8Y-m1UUK65pXNbK_-ceRCJmxL639PUHveZ2zeOenmLdGcAlVXaFbdrKl9Qv33e8W_-ru4MeTHUeOqTPZwmR4Q/s1600/7.png

Select the hard disk which you have used to install RHEL 7, as for my case as you can see 20GB hard drive.

Also if you want the OS to automatically create the partition select the same or else for this article lets manually create the partitions

https://blogger.googleusercontent.com/img/b/R29vZ2xl/AVvXsEhKUhu3nb8qJuwxhKLpgF8TgBjoN0_l9iHcSkkN-m0-bkln-MvUvBnk0qBRfWxEZKUgx-Q8M2qWQs9kMdMDsVw0t9Ehm-oO1BwH1yv-e5Lyvd-oIzxwXhwQSUTo9F1yaKuENB8oViMA6PI/s1600/8.png

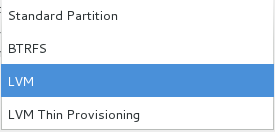
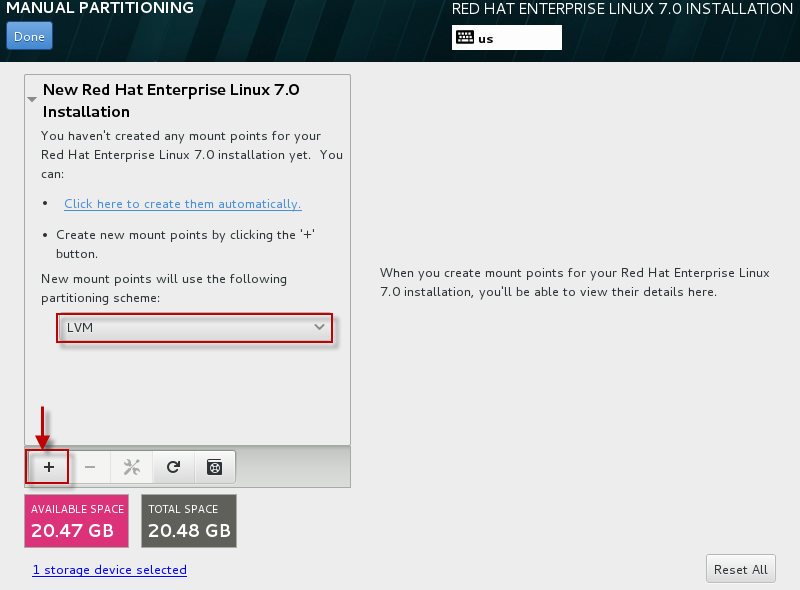
You can create a partition with the below list of partition types. As for this article we will select LVM

https://blogger.googleusercontent.com/img/b/R29vZ2xl/AVvXsEivCsU-glTXVokrM8y0zYj_1gyTk_qqbaMqXib3gKKJcHyPkBfznSdYALqjh4neZ4b66tawaroZ2i4tzWb2jjFliPbVX0-LwnssKWQ1ZPsQgmf_FDKf35cs84kH2c_h3Ia-87ANZ7wODUE/s1600/9.png

Click on the "+" sign to add new partition.

https://blogger.googleusercontent.com/img/b/R29vZ2xl/AVvXsEgQQxHNZYYVjwkFeoxAOubmnSc0CwGCO2Z6HAAui1o0mV9rn9DuPPqHWeCvxu7eXDgzlibWqoM10DQMV44IbW3RGislC8RXhQAGBw05NUradnqPYqq9ioX6rQLb-AM5SThiX2zNut2HfYU/s1600/10.png

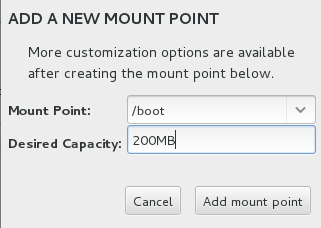
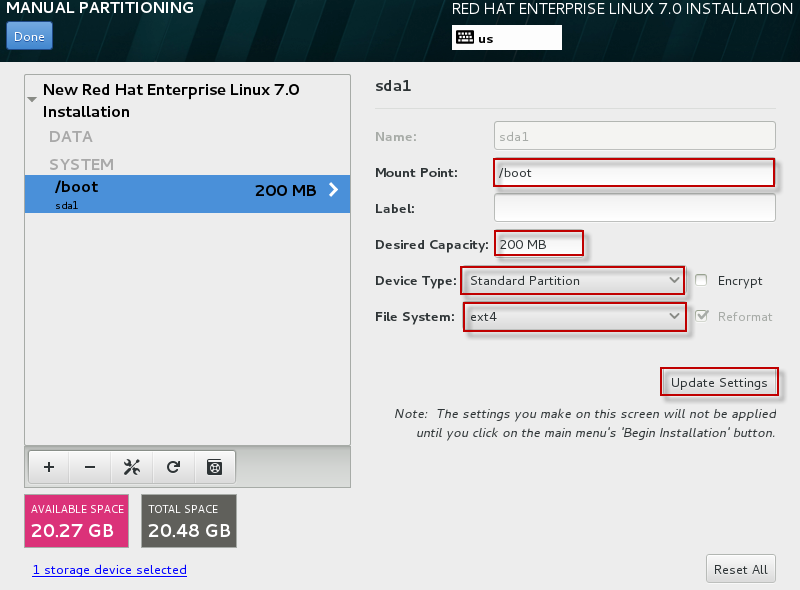
For this article I will create /boot, /, swap partition under LVM with Volume Group name as "VolGroup00"
https://blogger.googleusercontent.com/img/b/R29vZ2xl/AVvXsEhWL9CtGAdK_C20t-aHjDDFisy-QsvjE8DfUo11Ztgn3MaTN3W7S9-QoOSUwDwhyeGJCu_86E-hr2FUvwsVavrSg_YemHOOfX-RWHKqDB7LgpS9jyyMjPdbMPxKDePHV1pIPxUuaHKAPI8/s1600/11.png

Change the partition type to Ext4 as by default XFS will be selected for every partition you create.

Once you change these settings make sure you "update settings"

https://blogger.googleusercontent.com/img/b/R29vZ2xl/AVvXsEh0Mr_pb1YWSVJnvdZTMn0_7wYF6cyiVuGpPYLmwUQmb4TkIuLpyBkaYbPS0ane5cxbBtvp0IGhkLWuCicbUC04ankerLnsJeX31yLOgX7KmyyKDlFjVHy7GOyrSN9rJb7xnlhQzgLkeQE/s1600/12.png

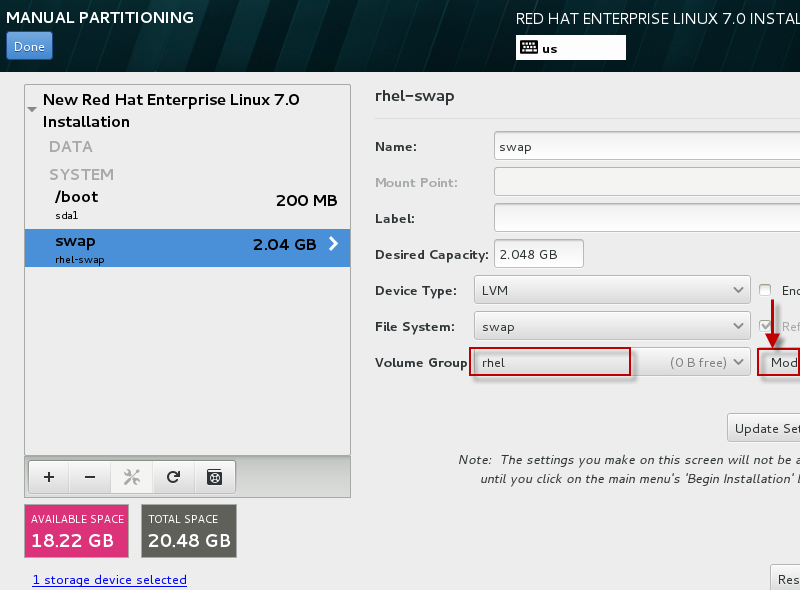
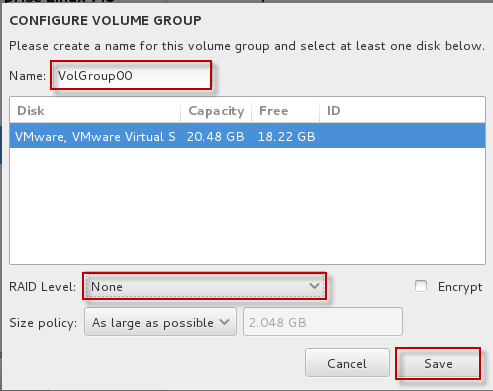
By default Volume Group name is "rhel". Let us change it to "VolGroup00"

https://blogger.googleusercontent.com/img/b/R29vZ2xl/AVvXsEgGUv6ba7PXaCgFJ5udf9PWRXzAjmZiygoMjvGYrtDKygYUTH3Ng-Qf52lqrTC7wVywSuuqCav0jPwpjHs06FovBRhG-A7vjonN5UQfMeB38MqNnRmpsyJ7J5ktM138aSB12RjGqh9syT8/s1600/13.png

You can also configure the storage for RAID but let us skip that part as of now.

https://blogger.googleusercontent.com/img/b/R29vZ2xl/AVvXsEhIx7iDMwVvyZQoMX8HWq4gh90kkD4rPEX3hNQidRE4eOOOER-Y_PZpJmwysj4kcBMWU6jItks4tKGCYK3RlHbvE5hs4pOHCv6tOLWIxBB20GrgJruP5rdXBPplcfxuEo9AratGGuozeUc/s1600/14.png

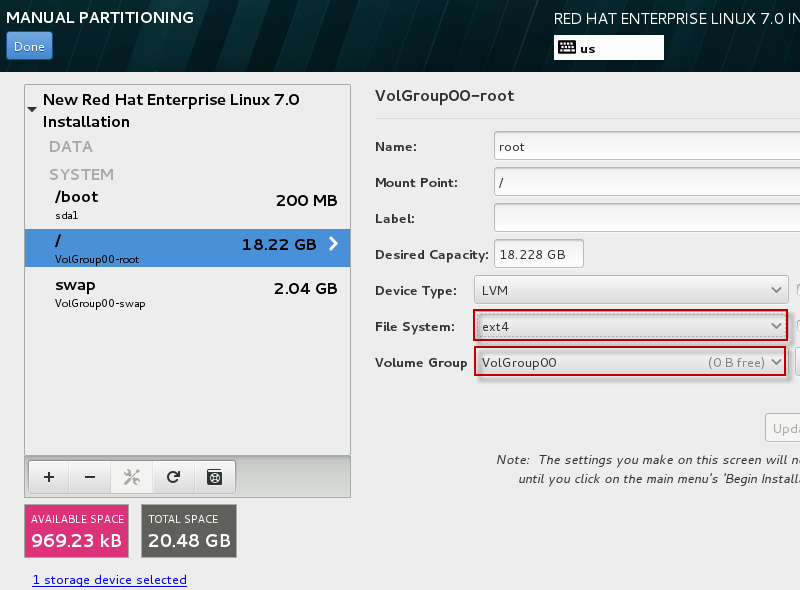
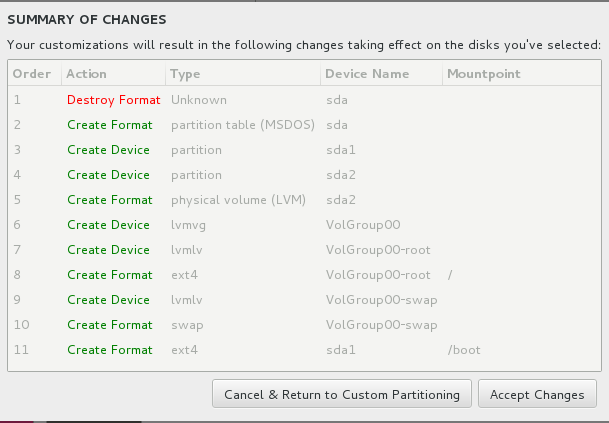
As you see all the mount points as planned are created with below name under LVM
 
VolGroup00-root
VolGroup-swap

https://blogger.googleusercontent.com/img/b/R29vZ2xl/AVvXsEjMajTRlO2x7qcYig9Mj1roqU184iAtILztYFtCVwkWqe98jx261E-7p5QPlyfOBCXM841DgimkgSL-INuCSzpsi7kan9oI-YNv4pOO402xJ0Z3MWP6KrYxDzwUEss-sKaQRR3YRX2tNA0/s1600/15.png

Click on Done and select Accept Changes.

https://blogger.googleusercontent.com/img/b/R29vZ2xl/AVvXsEgkSK3dSRnUaUgNTj-SIWoNlqtWVethgxDhVdFoJPGR8BqH6YjPSsgAHzEYvWWY52CfyPC2YPH_GDOZhp9Ixw0vZqNn0oUgVTlKtBY91HaMNy3TsAHrA7fSL6jsC6WREquij2uTs3Mpea0/s1600/16.png

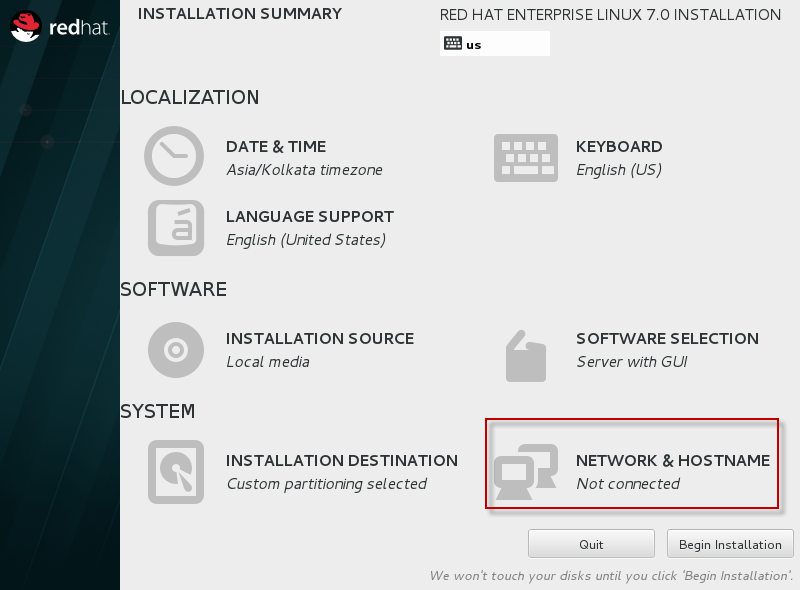
The last one is to Configure Network

https://blogger.googleusercontent.com/img/b/R29vZ2xl/AVvXsEj4pq8d8c-3fu-yZv4YlabCm9oJEW_OifsyrVzYQ66ES_Mzna02-pA_-6cIHFF_tGO0f_DtUjjpx0nkb2GBxI-NLiziz6RaRMrXSFLLxHalRd-eBCrfl8lqHOMF8Z7KWq6j_6wO5viB6gE/s1600/17.png

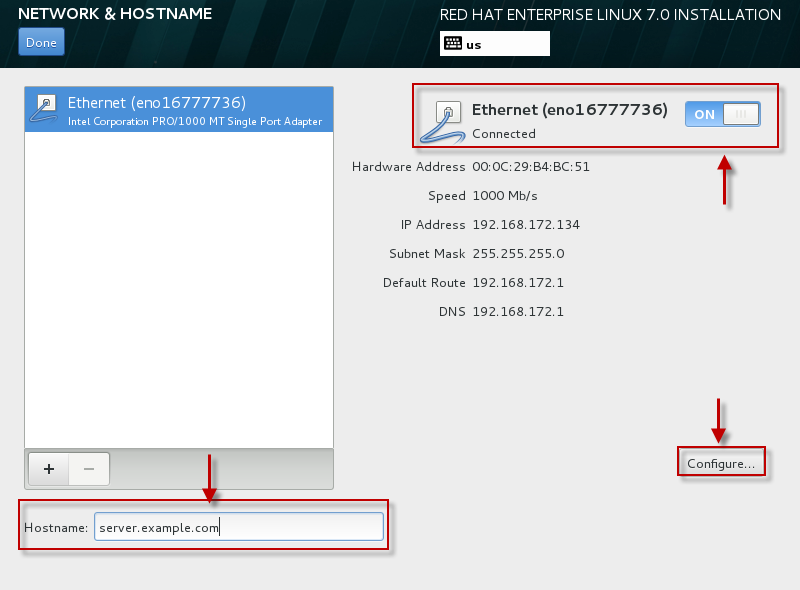
Provide a hostname for your machine and enable the Ethernet device. Next select Configure to configure network settings for your machine

https://blogger.googleusercontent.com/img/b/R29vZ2xl/AVvXsEhJOTwzLCWyveeNiwBk-yyocs3q3f0o5BpiY0p8RRB27F9qfOlcuzyXOHqy5TaMRe4jiTMUKgx93UmRHlxn_Fpnexv0drxwHqRbTqD9DZAqmBr1Areqm6lypQIupRJOr6gQywf74pPZLew/s1600/18.png

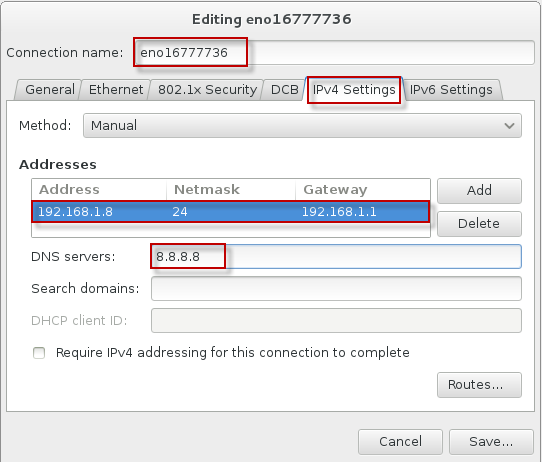
Change the Ethernet device name or else you can skip that part. Next configure you IP details as per your environment i.e IPv4 or IPv6. We are using IPv4 so selected the "IPv4 Settings" and added the IPNetmask, Gateway and DNS details in the same.. Click on "Done" to save the configuration and go a step back.

https://blogger.googleusercontent.com/img/b/R29vZ2xl/AVvXsEjFvoGM9YI-uhEqpLHeD5MsvmSJ2nuSM3BhSaAilnS7qnXKRfu-fLZw6UH8WIiwnym8xKCHNT6tTethBz19F7na5bS6ns0nhoN2uKjUV_QW1M_3DowfKL2eRqFCgiFsMncZCcl3GqYOAto/s1600/19.png

So we are done here with all the options on this screen. Next we can "Begin Installation"

https://blogger.googleusercontent.com/img/b/R29vZ2xl/AVvXsEjX-xz1tnF1tY1eCm0-USWDnpQhT5dz6oImnNuTkf_WZbr_IJ6HAWObd0XdqI77Lgl3uNwge5HiuzQGEfD5-NbSYqyM7x5n83nQoA2SHPHd59_4CYLDuDz7XtzZv-9wHCFix-DZmsrS-n8/s1600/20.png

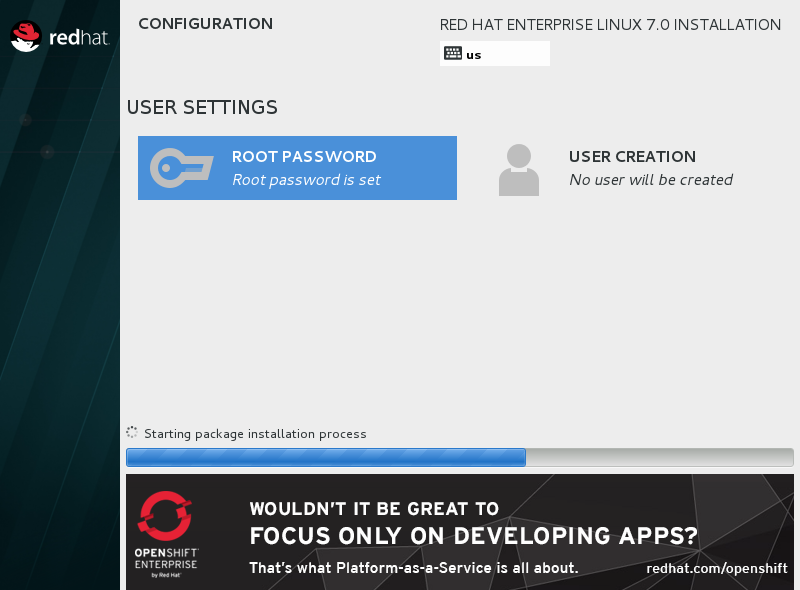
As you see the installation has begun in the mean time you can add a password for your root user. Also you can create additional user by using the "User Creation" thumbnail.

https://blogger.googleusercontent.com/img/b/R29vZ2xl/AVvXsEgKzNwZY9iQEVrHk9YSFUs6Y2oaotkzX9kThFLLIeShiJA_47qBQScTXLcZFK2OefKh-3rNTJtUEwQfOX-0oBURxBMTIO2TLkE-EI5IzHqFzuXp-yewUcLCy61XaPH_nURAiTf2sArBfF8/s1600/21.png

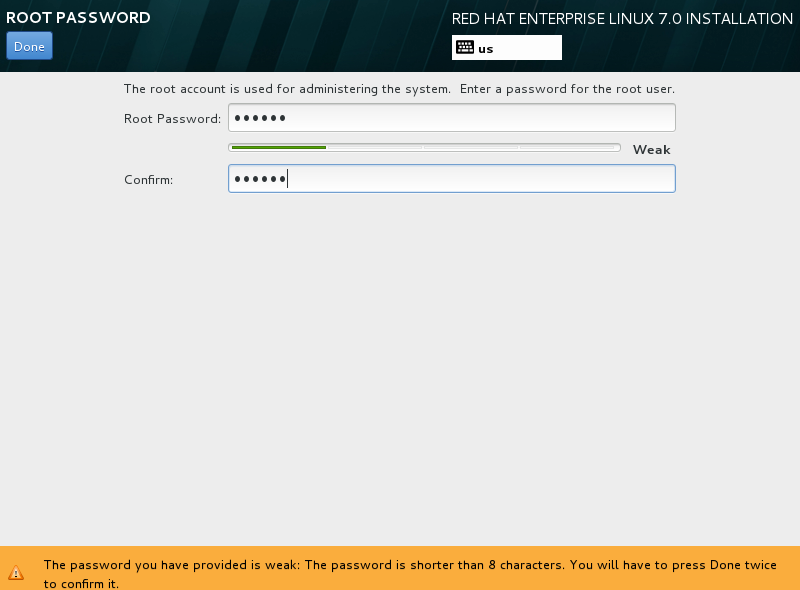
Provide a password for root account.

https://blogger.googleusercontent.com/img/b/R29vZ2xl/AVvXsEiD0366h1EU9btH0YHVyx7eO1t2aGFSjdqHd7QP-8SF8MaD_jy1s4mQ-AYeQUT7xlvGCpIrroY-WAiIfNjXj6IqIexGVJfdcWT0uSbwbnPwgLz-QeLzSosjH4fAEBKSoSK01EuebzouhLA/s1600/22.png

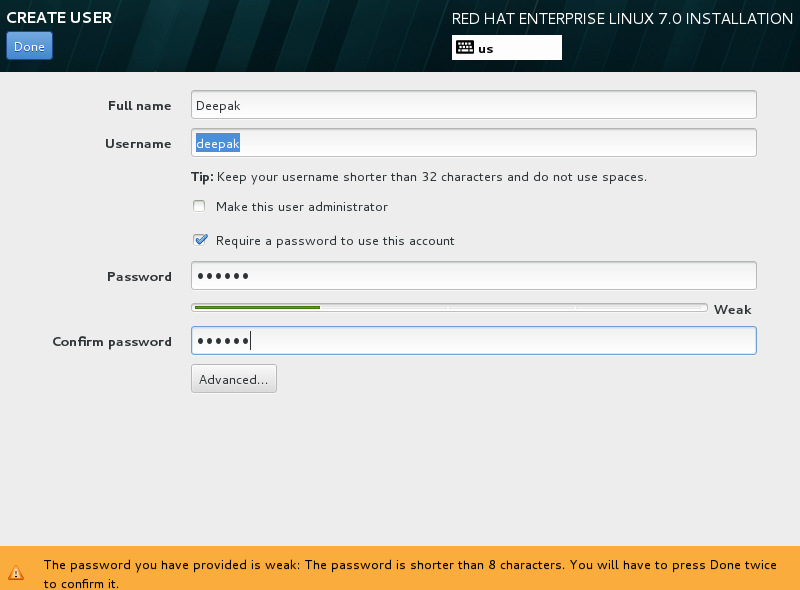
Create a user.(Optional)

https://blogger.googleusercontent.com/img/b/R29vZ2xl/AVvXsEgHwX8HHZpYTTOyEgrsg4QlB_qI_GaFm6dQK04b6Gc0hkT4nf1aYe8i2uyBL4ylzK4ApFsu_VAlzUb5PGGtEbhn6avddAaNLUZIQIZyJ4g2gKIW5QkNbiDPpAbagTQqnwU96PCdbL23tEM/s1600/23.png

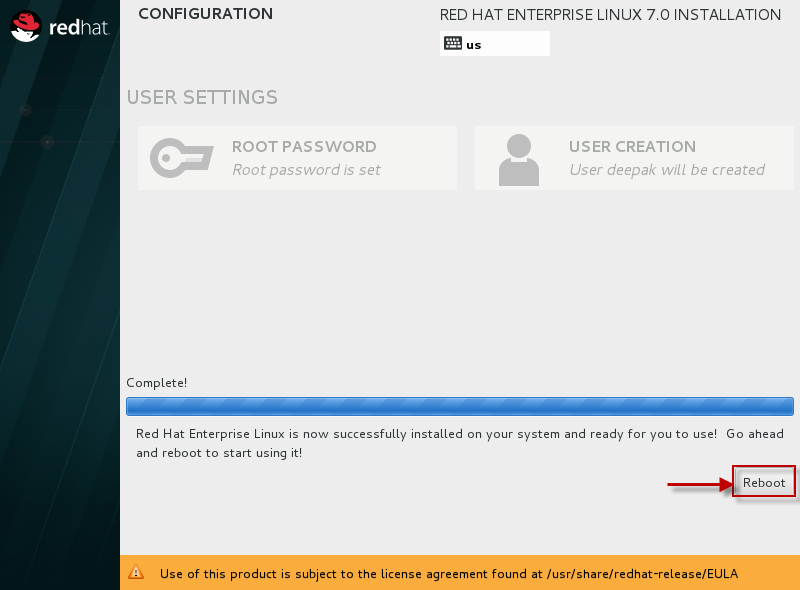
In the mean time let the installation complete. Once done click on Reboot.

https://blogger.googleusercontent.com/img/b/R29vZ2xl/AVvXsEiXUsJnZm7FVmhvi8oxCnTseqhqc55Kp9EF-clcpO0W10Tr22ec29PgKtTSLcmxvUCdB3jlS4hRvDCa5vxbWqpPaI7AtBUCy7aRlWAeFQSGY0SrRWAeJfqEMtllq4Gott1VTHpf-41mfUA/s1600/24.png

Once the machine reboots, next it will prompt the below screen. Click on "License Information"

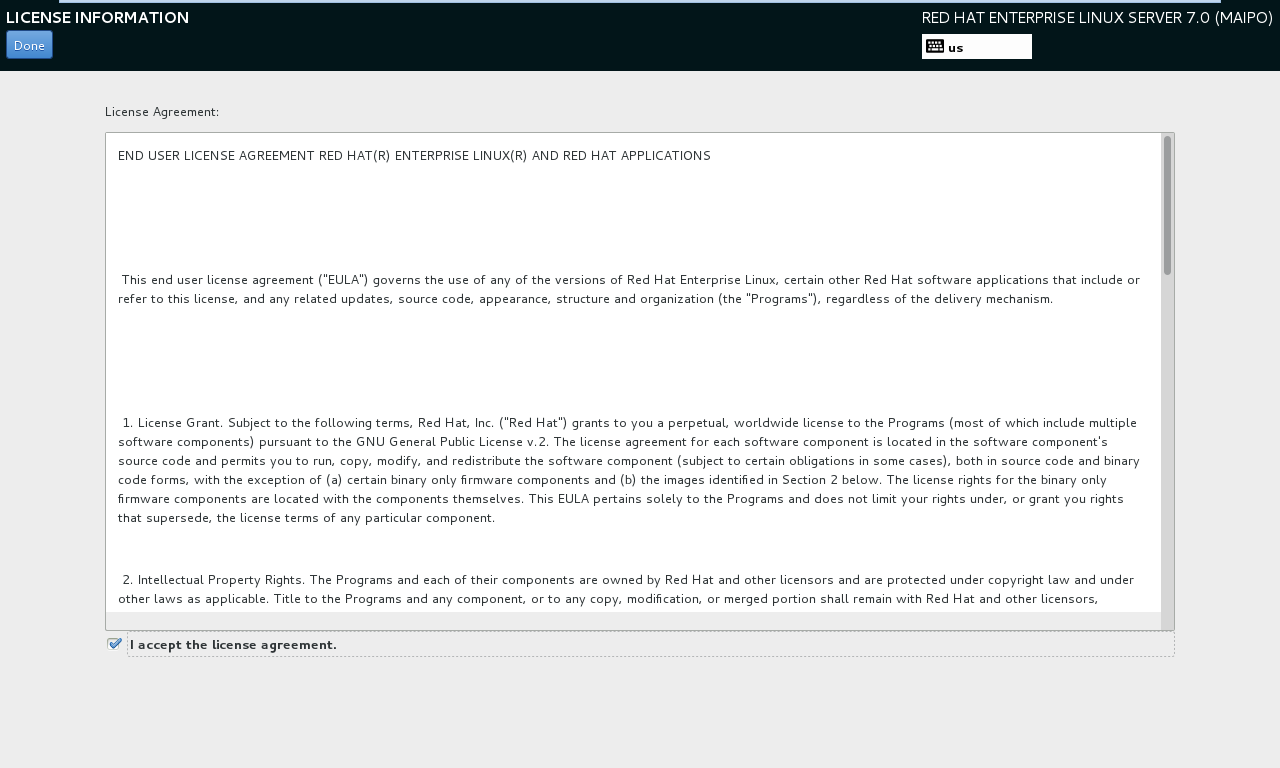
https://blogger.googleusercontent.com/img/b/R29vZ2xl/AVvXsEi2zoxwyUZqtv30hW3yqvcUn5dut-GXYVE2UQCsj031P7kmUOOpDUGXz2_k020njbgEVSV6qD-u5Z20e6G62747FliFFwjB__3dcb9i7gmfMOd__D5u8k0XOog0RB4LPV4_19ZWC7FIAI8/s1600/26.png

Accept the Terms and Conditions

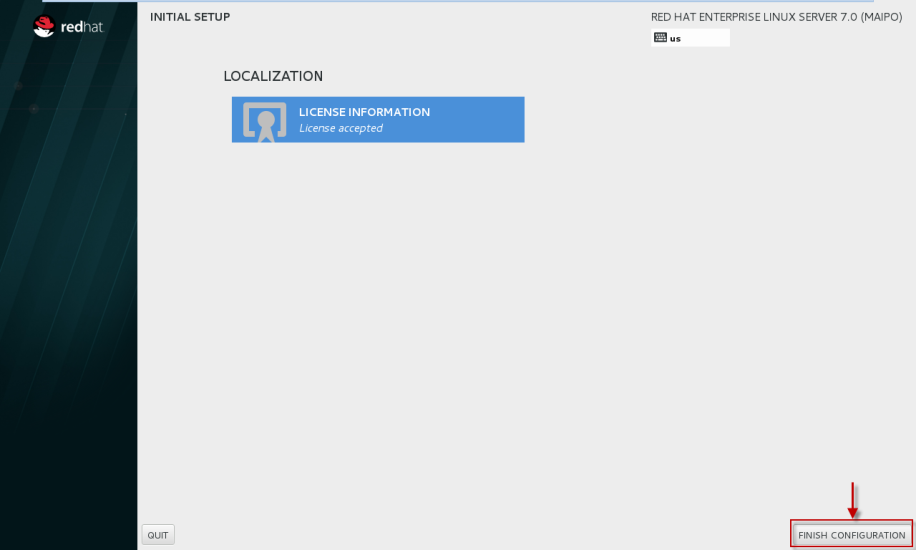
https://blogger.googleusercontent.com/img/b/R29vZ2xl/AVvXsEib299Bq7GdjK0vnsHImdZ3ubXeoqsmxeTJG9WkxNfUWzD7etKOt4vU259kkcUromrQAHxZtBozExJ2zt68VCIaNTGo4D13BAHgRn9T7pGkMu_6rcCrnTk7e0fesSwurYvCtW1SkmtC_hg/s1600/27.png

Click on "Finish Configuration"

https://blogger.googleusercontent.com/img/b/R29vZ2xl/AVvXsEjRvGQy4FvlBSosTH9jZbxoSopZvZnq-p9fYNII1JUmmto93FXOMk23qqlp1rx-zkPLGV_7lZh7mOmfJlT2Cx6YZgyVBT71XRUXGiaO9TigHtnCe0Dkeab42XYrdJmtKPZbZyCNuFBX-H4/s1600/28.png

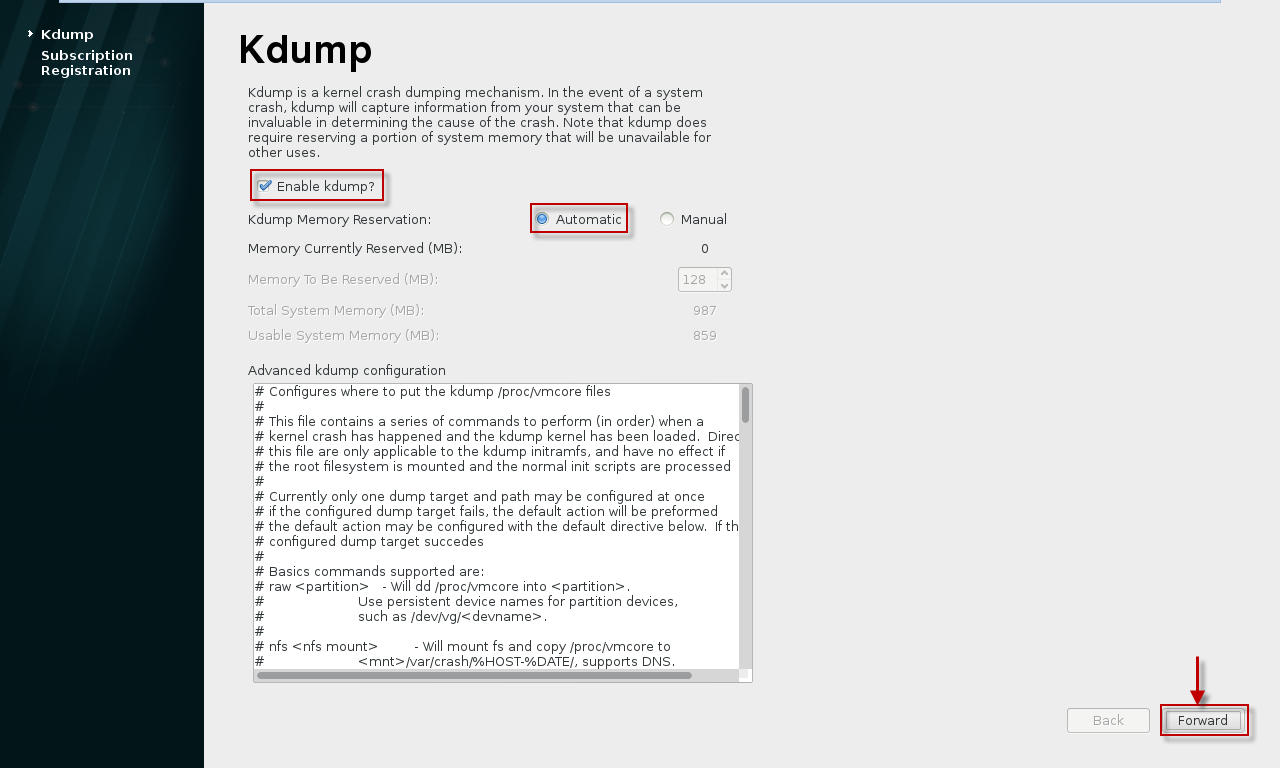
Next you will get the Kdump configuration page.

Let us enable the Kdump and let the machine decide the amount of memory required for the same.

https://blogger.googleusercontent.com/img/b/R29vZ2xl/AVvXsEhgRvWE_fZe2z0nJKYn5OYybY5ceYeyrlcIdMPSnHQxrHiSzIDObkvKMlWMuTHNxjG72OoFKMdm4jStCN8_NeygqaxKAIkWQfa2vBD2nvXYWE0HrqubCsBIw_B5hi4t7qRTJLt9zJoIBwY/s1600/29.png

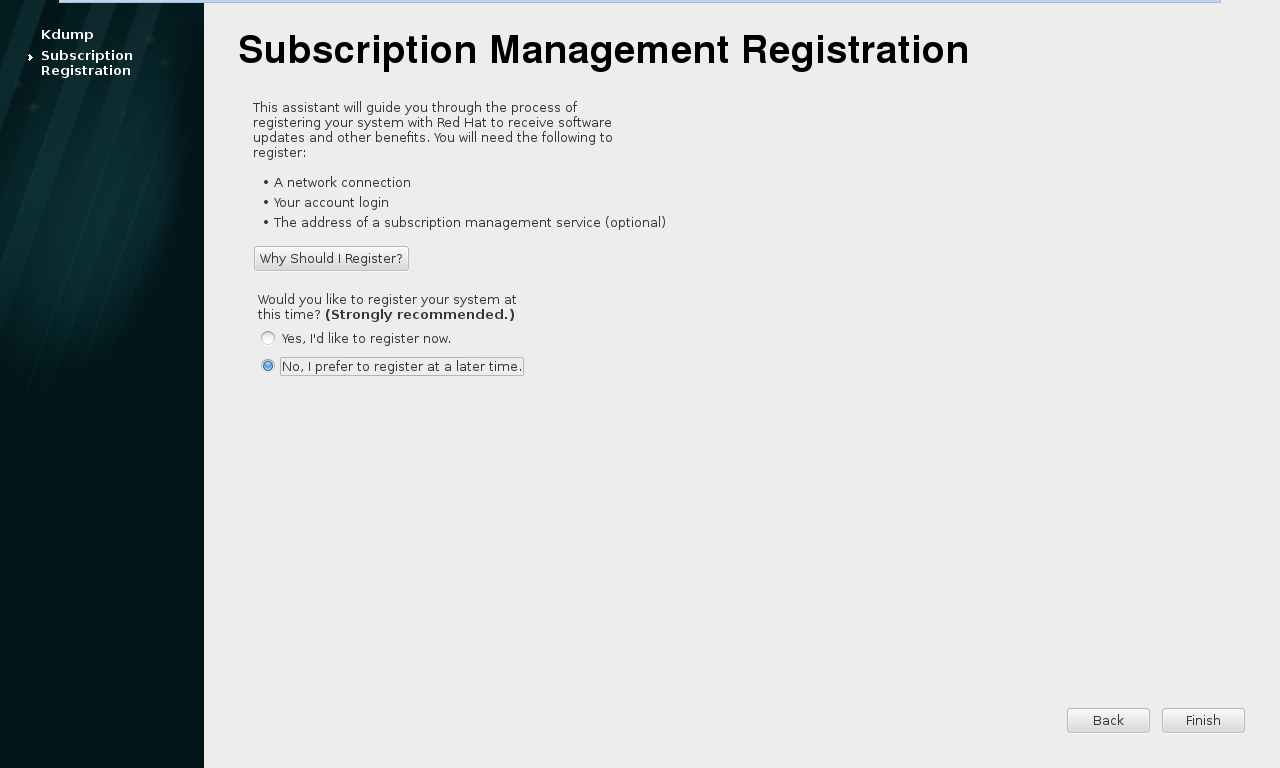
I do not want to register my system to RHN as for now, also we can perform this step later so let us skip this part for now.

https://blogger.googleusercontent.com/img/b/R29vZ2xl/AVvXsEgWFTz8kVraQj1bpBsX1DV0i6S_p-QMUzRuJtwmwRbsJZolKgTHQvLQ2ObxVTv2c74NMiQrfz7FrNNReIsh54KOTY0x_-uniorPNMasCVHd3ZwMuYXkGbppUcqw-D4Bz6G-GTcBLH-g3b8/s1600/30.png

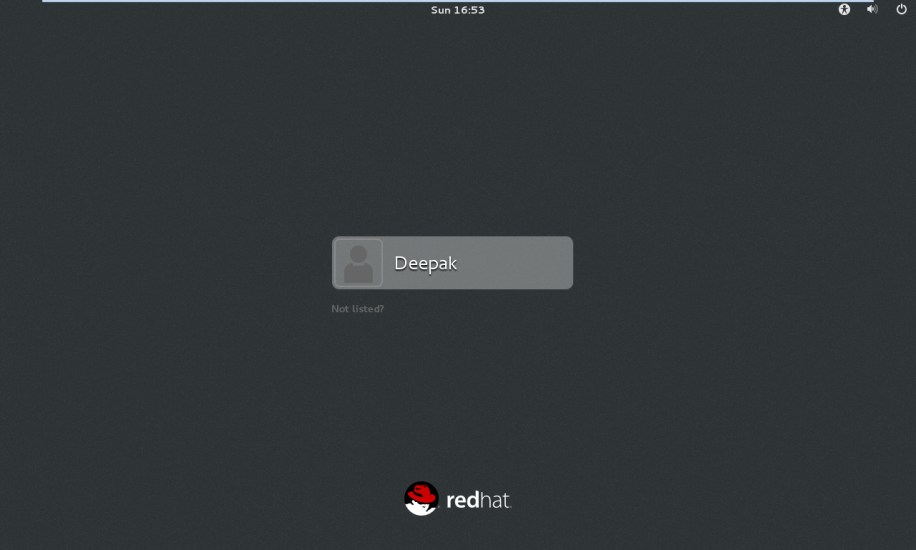
Next you get your Login Screen which means we have successfully installed our Operation System i.e. RHEL 7.0 (64 bit).

https://blogger.googleusercontent.com/img/b/R29vZ2xl/AVvXsEipkEXbs8hB-fsNPCUgU51lZffGGdK3Toymsq9oT-fdmz6CQXpVMgdMNDr8S4jxhyNcaKrjnwiKDUiQWNToAfBKJnj-ba5KHih9Q5vBEgLCxJI24W1BIEgGcy4cDJ5kTS4UjYPqHZOUMCQ/s1600/31.png