Command
|
What It Does
|
Usage
|
Examples
|
dcat
|
Copies source paths tostdout.
|
hdfsdfs -cat URI [URI …]
|
hdfsdfs -cat hdfs://
<path>/file1; hdfs dfs -cat file:///file2 /user/hadoop/file3 |
chgrp
|
Changes the group association of files. With -R, makes the change recursively by way of the directory structure. The user must be the file owner or the superuser.
|
hdfsdfs -chgrp [-R] GROUP URI [URI …]
| |
chmod
|
Changes the permissions of files. With -R, makes the change recursively by way of the directory structure. The user must be the file owner or the superuser.
|
hdfsdfs -chmod [-R] <MODE[,MODE]... | OCTALMODE> URI [URI …]
|
hdfsdfs -chmod 777
test/data1.txt |
chown
|
Changes the owner of files. With -R, makes the change recursively by way of the directory structure. The user must be the superuser.
|
hdfsdfs -chown [-R] [OWNER][:[GROUP]] URI [URI ]
|
hdfsdfs -chown -R
hduser2 /opt/hadoop/logs |
copyFromLocal
|
Works similarly to the put command, except that the source is restricted to a local file reference.
|
hdfsdfs -copyFromLocal<localsrc> URI
|
hdfsdfs -copyFromLocal input/docs/data2.txt hdfs://localhost/user/
rosemary/data2.txt |
copyToLocal
|
Works similarly to the getcommand, except that the destination is restricted to a local file reference.
|
hdfsdfs -copyToLocal [-ignorecrc] [-crc] URI <localdst>
|
hdfsdfs -copyToLocal
data2.txt data2.copy.txt |
count
|
Counts the number of directories, files, and bytes under the paths that match the specified file pattern.
|
hdfsdfs -count [-q] <paths>
|
hdfsdfs -count hdfs://nn1.example.com/
file1 hdfs://nn2.example.com/ file2 |
cp
|
Copies one or more files from a specified source to a specified destination. If you specify multiple sources, the specified destination must be a directory.
|
hdfsdfs -cp URI [URI …] <dest>
|
hdfsdfs -cp /user/hadoop/file1 /user/hadoop/file2 /user/hadoop/dir
|
du
|
Displays the size of the specified file, or the sizes of files and directories that are contained in the specified directory. If you specify the-s option, displays an aggregate summary of file sizes rather than individual file sizes. If you specify the-h option, formats the file sizes in a "human-readable" way.
|
hdfsdfs -du [-s] [-h] URI [URI …]
|
hdfsdfs -du /user/hadoop/dir1 /user/hadoop/file1
|
dus
|
Displays a summary of file sizes; equivalent to hdfsdfs -du –s.
|
hdfsdfs -dus<args>
| |
expunge
|
Empties the trash. When you delete a file, it isn’t removed immediately from HDFS, but is renamed to a file in the /trash directory. As long as the file remains there, you can undelete it if you change your mind, though only the latest copy of the deleted file can be restored.
|
hdfsdfs –expunge
| |
get
|
Copies files to the local file system. Files that fail a cyclic redundancy check (CRC) can still be copied if you specify the -ignorecrc option. The CRC is a common technique for detecting data transmission errors. CRC checksum files have the .crc extension and are used to verify the data integrity of another file. These files are copied if you specify the -crcoption.
|
hdfsdfs -get [-ignorecrc] [-crc] <src><localdst>
|
hdfsdfs -get /user/hadoop/file3
localfile |
getmerge
|
Concatenates the files insrc and writes the result to the specified local destination file. To add a newline character at the end of each file, specify theaddnl option.
|
hdfsdfs -getmerge<src><localdst> [addnl]
|
hdfsdfs -getmerge /user/hadoop/mydir/ ~/result_fileaddnl
|
ls
|
Returns statistics for the specified files or directories.
|
hdfsdfs -ls<args>
|
hdfsdfs -ls /user/hadoop/file1
|
lsr
|
Serves as the recursive version of ls; similar to the Unix command ls -R.
|
hdfsdfs -lsr<args>
|
hdfsdfs -lsr /user/
hadoop |
mkdir
|
Creates directories on one or more specified paths. Its behavior is similar to the Unix mkdir -p command, which creates all directories that lead up to the specified directory if they don’t exist already.
|
hdfsdfs -mkdir<paths>
|
hdfsdfs -mkdir /user/hadoop/dir5/temp
|
moveFromLocal
|
Works similarly to the putcommand, except that the source is deleted after it is copied.
|
hdfsdfs -moveFromLocal<localsrc><dest>
|
hdfsdfs -moveFromLocal localfile1 localfile2 /user/hadoop/hadoopdir
|
mv
|
Moves one or more files from a specified source to a specified destination. If you specify multiple sources, the specified destination must be a directory. Moving files across file systems isn’t permitted.
|
hdfsdfs -mv URI [URI …] <dest>
|
hdfsdfs -mv /user/hadoop/file1 /user/hadoop/file2
|
put
|
Copies files from the local file system to the destination file system. This command can also read input from stdin and write to the destination file system.
|
hdfsdfs -put <localsrc> ... <dest>
|
hdfsdfs -put localfile1 localfile2 /user/hadoop/hadoopdir;
hdfsdfs -put - /user/hadoop/hadoopdir (reads input from stdin) |
rm
|
Deletes one or more specified files. This command doesn’t delete empty directories or files. To bypass the trash (if it’s enabled) and delete the specified files immediately, specify the -skipTrashoption.
|
hdfsdfs -rm [-skipTrash] URI [URI …]
|
hdfsdfs -rm hdfs://nn.example.com/
file9 |
rmr
|
Serves as the recursive version of –rm.
|
hdfsdfs -rmr [-skipTrash] URI [URI …]
|
hdfsdfs -rmr /user/hadoop/dir
|
setrep
|
Changes the replication factor for a specified file or directory. With -R, makes the change recursively by way of the directory structure.
|
hdfsdfs -setrep<rep> [-R] <path>
|
hdfsdfs -setrep 3 -R /user/hadoop/dir1
|
stat
|
Displays information about the specified path.
|
hdfsdfs -stat URI [URI …]
|
hdfsdfs -stat /user/hadoop/dir1
|
tail
|
Displays the last kilobyte of a specified file to stdout. The syntax supports the Unix -f option, which enables the specified file to be monitored. As new lines are added to the file by another process, tailupdates the display.
|
hdfsdfs -tail [-f] URI
|
hdfsdfs -tail /user/hadoop/dir1
|
test
|
Returns attributes of the specified file or directory. Specifies -e to determine whether the file or directory exists; -z to determine whether the file or directory is empty; and -d to determine whether the URI is a directory.
|
hdfsdfs -test -[ezd] URI
|
hdfsdfs -test /user/hadoop/dir1
|
text
|
Outputs a specified source file in text format. Valid input file formats are zipandTextRecordInputStream.
|
hdfsdfs -text <src>
|
hdfsdfs -text /user/hadoop/file8.zip
|
touchz
|
Creates a new, empty file of size 0 in the specified path.
|
hdfsdfs -touchz<path>
|
hdfsdfs -touchz /user/hadoop/file12
|

Friday, September 15, 2017
Hadoop Commands

Wednesday, August 30, 2017
LOADING DATA FROM MULTIPLE FLAT FILES TO SINGLE TARGET TABLE
Implementing the steps for loading the data from multiple flat files to
single oracle table
Source:
- Let us consider the Flat files(txt files) namely
1) flatfile1.txt
2) flatfile2.txt
3) flatfile3.txt
4) flatfile4.txt
5) flatfile5.txt
keep all these files in a folder and save it in a Local Drive.
- These flat files are having same structure with unique data and to be considered as the source.
- In oracle DB, create a new schema as source and grant DBA permissions to it. In this schema, create a table(KC) with the columns as FID, FILENAME, STATUS and insert the values as follows
FID FILENAME STATUS
----- --------------- ------------
1 flatfile1 N
2 flatfile2 N
3 flatfile3 N
4 flatfile4 N
5 flatfile5 N
- This table could be called by refreshing variable at ODI level.
Target:
- In Oracle DB, in the same schema create a table (CL) with columns similar to the flat files structure (i.e., the columns present in the flat files are to be taken).
- Data is to be loaded after executing the ETL process.
Loading data from Source to Target:
- In ODI, login to work repository. We have the source as Flat file. So in Physical Architecture select the Technology as File Technology.
- File Technology -->New Data Server --> Name: Give any name.
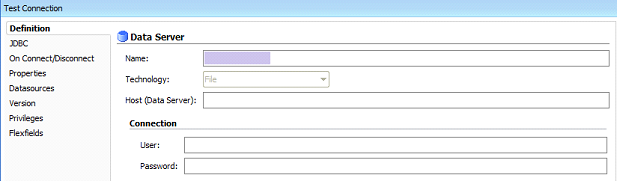
- Go to JDBC ,
JDBC Driver: Click on search icon, keep the JDBC Driver as appears and
click ok.
JDBC Url : Click on search icon, keep the Url up to jdbc:snps:dbfile and
delete the remaining and click ok.
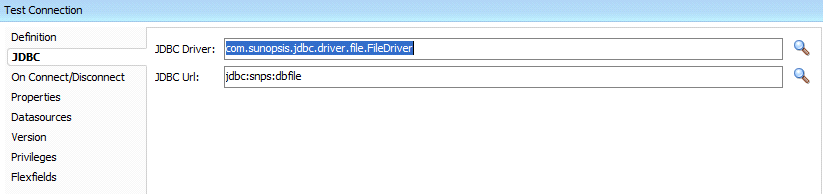
- Data Server for source is created.
- Now create Physical Schema for this Source Data Server.
- Right click on the Data Server select Physical Schema.
- In the Physical Schema (Definition), select
Directory (schema) : Place the path were the flat files are saved
Directory (work schema): Place the same path as above
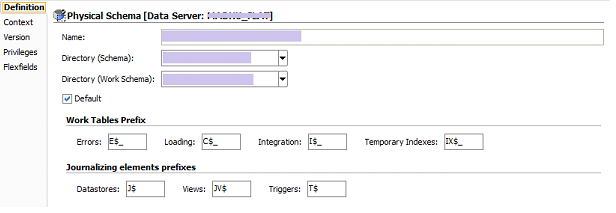
- Now move to context and set the logical schema. Select context as Global & set Logical Schema with any name ending with “_LS”.

- Hence, the process completed for file technology.
- Now select the Oracle Technology in Physical Architecture for the Target.
- Oracle Technology -->New Data Server --> Name: Give any name.
- Give the User name & Password as the Schema and password created for the Target.
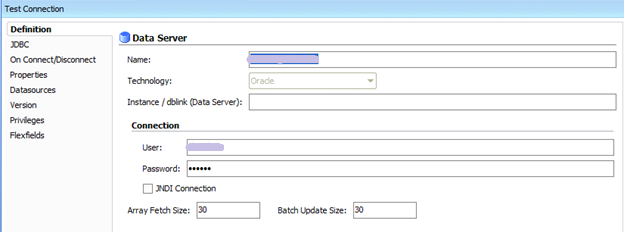
- Move to JDBC,
JDBC Driver: Click on search icon, keep the JDBC Driver as it appears and click ok.
JDBC URL : Click on Search icon, set
Hostname as localhost, Port number as 1521, SID as orcl
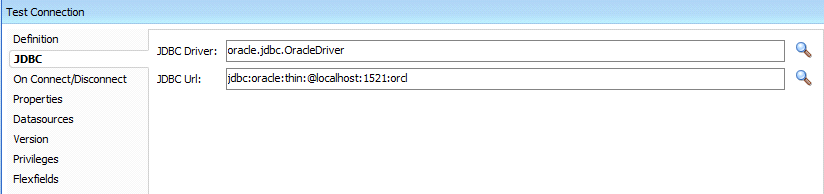
- Data Server is created for Target.
- Now create Physical Schema for the Target Data Server.
- Right click on the Data Server, select Physical Schema.
- In the Physical Schema (Definition), select
Directory (schema) : Point out the Schema which was created
for target.
Directory (work schema) : Same as above
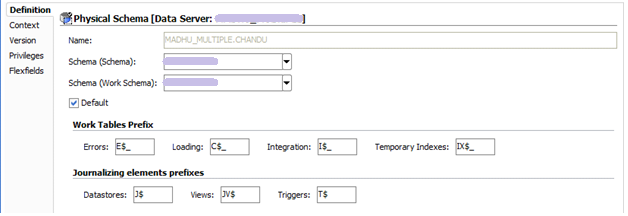
- Now move to context and set the logical schema.
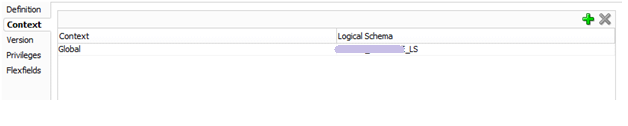
- Hence, the process completed for the Oracle Technology.
- Now go to Designer component and create a new Model folder

- Now create a new model for source (i.e., for flat files) as follows

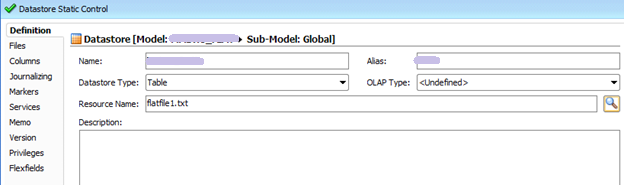
- Here, the source is Flat file. So for this we have to create Datastore.
- Right click on the source model and select New Datastore. It displays a window.
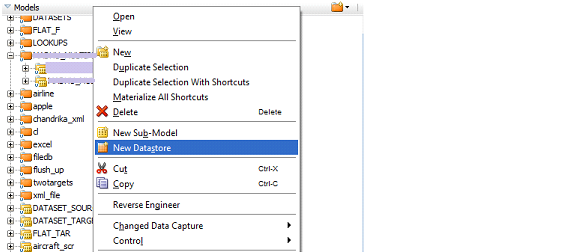
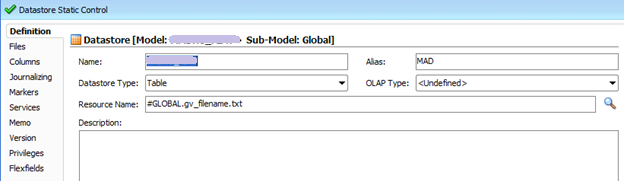
- In this, for Resource Name: Point out the flat file name with “.txt” extension as below
- Now create a model for Target
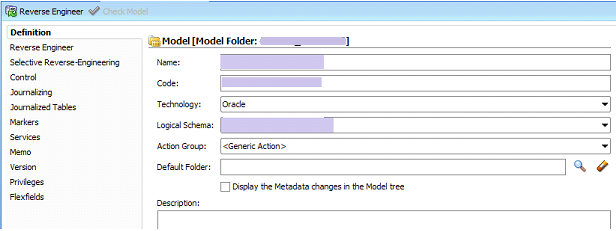
- Move to selective Reverse-Engineering and follow as below

- Reverse Engineering for target is completed.
- Create a Global Variable as below
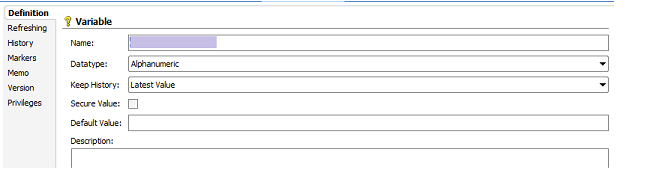
- Move to Refreshing, set the Schema and for Select Query write the query as follows

- Create a New Project

- In this Project, Create a Project Variable as below
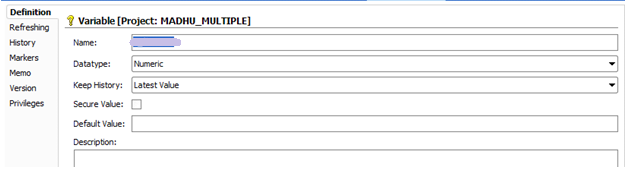
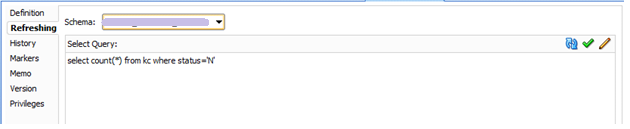
- Move to Refreshing, set the Logical Schema and Select Query as below—
- Now create an Interface

Now change your resource name as the global variable name .
Note: change resource name before using them in the mappings.
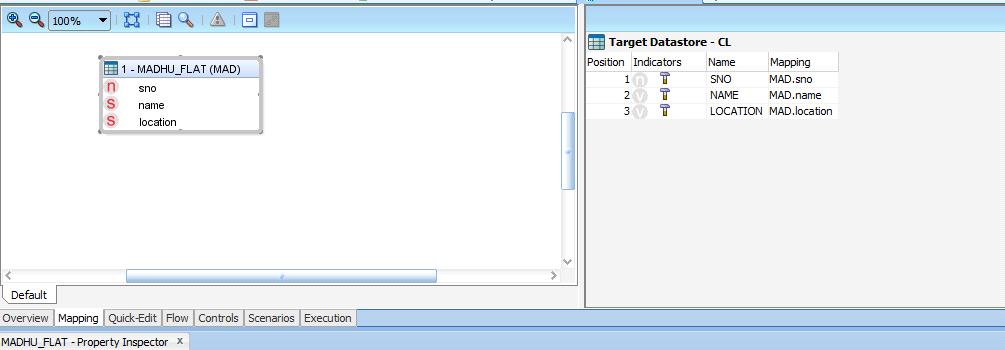
- Now go for Mappings
- Import the Knowledge Modules as per the requirement
For LKM select FILE TO SQL
For IKM select SQL CONTROL APPEND
- Set Flow Control as TRUE
- Set Truncate as False

- Create a Procedure as follows
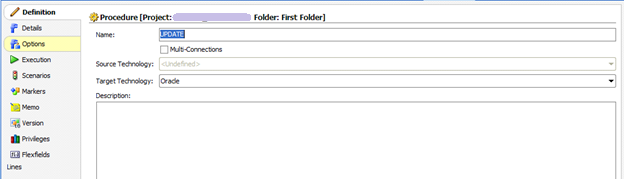
- Go to Execution and make as follows

- Create a Package in this Project and arrange as below
- v_filecount as refresh variable
- v_filecount as evaluate variable and remaining variables as
- refresh variables
- The arrangements should appear like below
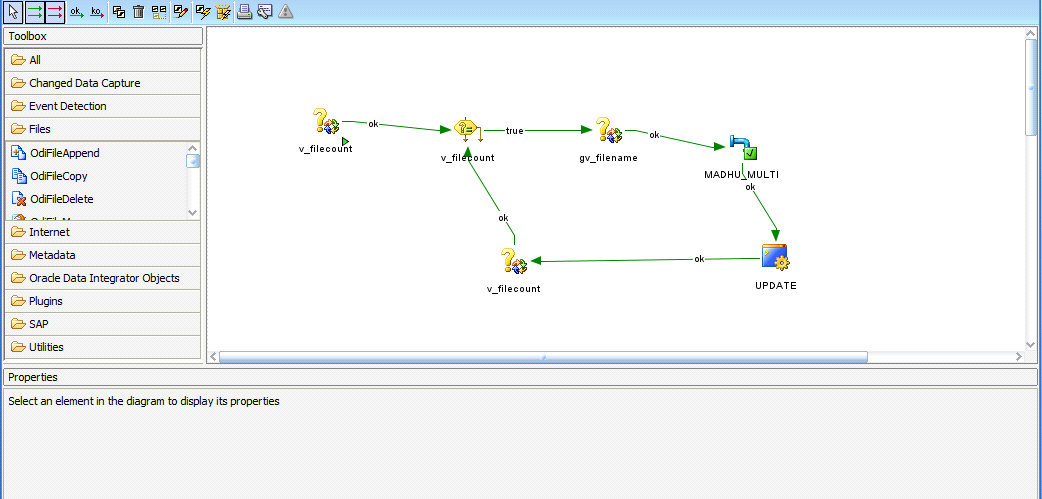
- Now save and execute it.
- Check the status in Operator Component.
- Hence, the data loaded into Target Oracle Table.
- Also check the KC table in DB. Observe that the status was updated to “Y”.
FID FILENAME STATUS
----- --------------- -----------
1 flatfile1 Y
2 flatfile2 y
3 flatfile3 y
4 flatfile4 y
5 flatfile5 y
Thursday, July 13, 2017
Digital Marketing


Digital Marketing is Next Big thing. People nowadays are understanding that Digital Marketing is in high demand. some people might also think that it is just a hype and it will not last long. After looking and understanding the customer behavior the brand and marketing strategies which we are following can benefit the changing times It is proven that Digital Marketing is going to rule the world.

During the past three to five years the customer behaviour has changed a lot. We can find more than 400 million internet users in India and they are the boss for every business. Each and every business activity should synchronize their needs and behaviour as according to latest trends to overcome competitors in their respective fields. This change has brought a huge need for online advertising for brands. Brand Promotion and Online Reputation Management helps to advertise their products or services


The growth of Digital Marketing resembles the growth of Small Start-ups, businesses, and Internet users in India. Finding the Right Digital Marketer with good talent is a major bottleneck in India. As per one survey report Demand exceeds supply for Digital Marketing Jobs. There is a huge demand for Digital Marketing Jobs. A Candidate with 2-3 years of experience in Digital Marketing is earning 5-10 Lakhs per annum. The Real-time data report shows that an Average salary for a Digital Marketer with few years of experience will earn around 7.2 Lakhs Per Annum. As per latest survey report there are 8 Lakhs Digital Marketing Jobs that are there available in India alone. If we see in global perspective the number of jobs available are pretty high.


People who want to start their career in Digital Marketing should possess the skills along with personal branding. Basically, for a fresher, they need to focus on learning and practicing things with good analysing power and develop a passion for Digital Marketing. There are several career options for a Digital Marketer to focus like Content Writer, Designer, Conversion Rate Optimizer, Copy writer, Content Marketing Manager, Inbound Marketing Manager, Search Engine Marketer, SEO Specialist, Social Media Manager, Analytics Expert and several higher positions. The roles vary from company to company and if the company is start up multiple roles will be handled by one digital marketer.

Subscribe to:
Posts (Atom)