
Creating a cube in OWB (Oracle Warehouse Builder 11gR2)
Now that we have our dimensions defined, we have one last step to cover and our design for our data warehouse will be complete. We need to define our cube, which is where our measures will be stored—the facts that users will want to query. We discussed the design of our cube and agreed that we would store two measures, namely the sales amount and the number of items sold. We have already designed our three dimensions, and their links and measures will go together to make up the information stored in our cube.
There is a wizard available to us for creating a cube that we will
make use of to ease our task. So let’s start designing the cube with the
wizard.
Creating a cube with the
wizard
We
will start the wizard in a similar
manner
to how we started up the Dimension wizard. Right-click on the Cubes node under
the ACME_DWH module in the Project Navigator, select New Cube to launch the
cube-creation wizard. The first screen will be the welcome screen, which will
summarize the steps it will lead us through as shown in the following image of
the main part of the welcome dialog box:

The
following are the steps in the creation process:
1. We
proceed right to the first
step where we
give our cube a name. As we will be primarily storing sales data, let’s call
our cube SALES and proceed to the next step.
2. In
this step, we will select the storage type just
as we did for the dimensions. We will select ROLAP: Relational Storage to match
our dimension storage option, and then move to the next step.
3. In
this step, we will choose the dimensions to include
with our cube. We have defined three, and want them all included. So, we can
click on the double arrow in the center to move all the dimensions and select
them. If we had more dimensions defined than we were going to include with this
cube, we would click on each, and click on the single right arrow (to move each
of them over); or we could select multiple dimensions at one time by holding
down the Ctrl key as we clicked on each dimension. Then click the single right
arrow to move those selected dimensions. This step looks like the following
after we’ve made our selections:

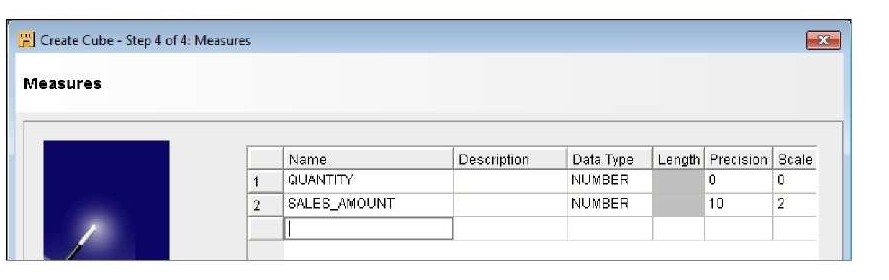
4.
Moving on to the last step, we will enter the measures we would like the
cube to contain. When we enter QUANTITY for the first measure with precision
and scale set to zeros and SALES_AMOUNT with precision 10 and scale 2 for the
second one, we end up with a screen that should look similar to this with the
dialog box expanded to show all the columns:
Clicking on Next
in step 4 will bring us to the final screen where a summary of the actions it
will take are listed. Selecting Finish on this screen will close the dialog box
and place the cube in the Project Navigator.
The
final screen looks like the following when scrolled all the way to the bottom:

This dialog box
works in a slightly different way than the dimension wizard. This final screen
is the second-to-last screen when creating a dimension. The dimension wizard
will present us with the progress screen as the final step. For cubes, the
process is not quite as involved. That’s because at this point, the cube is
basically done with nothing left to do afterwards. So we may think we missed a
step, but not to worry. Clicking on Next on this screen will exit the dialog
box, and the cube will be created and will be accessible in the Project
Navigator window.
Just
as with the dimension wizard earlier,
we get to see
what the cube wizard is going to create for us in the Warehouse Builder. We
gave it a name, selected the dimensions to include, and specified the measures.
The rest of the information was included by the wizard on its own. The wizard
shows us that it will be creating a table named sales for us that will contain
the referenced columns, which it figured out from the dimension and measures
information we provided. At this point, nothing has actually been created in
the database apart from the definitions of the objects in the Warehouse Builder
workspace. We can verify that if we look under the Tables entry under our
ACME_DWH database node. We’ll see a table named sales along with tables named
product, store, and date_dim. These are the tables corresponding to our three
dimensions and the cube.
You
may have a slightly different table name. The wizard will not create a table with the
same name as one already created, so it will append a unique number to the end
to keep the table names from conflicting. This could happen if you’ve
previously created a dimension with the same name, and then removed it and
recreated it. It may not remove the associated table when you delete a cube or
dimension object. The tables will appear in the Project Navigator under the
Tables node. Expand that and you’ll see the list of tables. Right-click a table
and select Delete. The Warehouse Builder will ask if you really want to delete
it, and will provide a checkbox to put the object in the recycle bin. Leave it
checked just to be safe and click on OK, and the table will be removed.
The foreign keys
we can see in the previous image are the pointers to the dimension tables. They
will make the connection between our cube and our dimensions when they are
deployed to the database.
There
is one final item that we did not specify and that is the cube aggregation method to be
used. We saw earlier in the topic how the multidimensional implementation
contains behind-the-scenes functionality that we don’t have to specify. Later
we also saw how important it was to be aware of the aggregation of our
measures, and whether they can be summed together at different levels and
within the same level.
The aggregation the cube will perform for us when we
view different levels is one of those behind-the-scenes capabilities we would
get with the OLAP feature.
When
we view the region amounts,
they will
automatically be summed up from the amounts of the various stores in the region
without us having to do anything extra. This is a nice feature the
multidimensional implementation gives us, but aggregations are not created for
the pure relational storage option. As we can generate either a relational or a
multidimensional implementation, this had to be specified anyway and so it
defaulted to sum. If we install the OLAP option or use a separate OLAP database
in the future, we can change that aggregation method. But for now, we do not
need it. It is possible to use aggregations with a pure relational
implementation by creating separate summing tables, and there are OLAP data
mining applications that can make use of them for more advanced
implementations.
We click on the
Finish button on this final screen and our sales cube is created. We’ll save
our work with the Ctrl+S key combination or from the design main menu. Our cube
and dimensions are now complete. Let’s take a look next at data object editors
where we can view and edit our objects.
No comments:
Post a Comment