
Populated W_DAY_D and Configure the Multi Calendar support:
Oracle BI Applications
come with a predefined Informatica Repository and a pre-built DAC
(Datawarehouse Administration Console) repository. When loading the BAW
(Business Analysis Warehouse, the predefined schema) for the first time, this
is called a full load.
One table is of
particular interest: W_DAY_D, implementing the time dimension, storing one
record for each day between 1st of January 1980 and 31st of December 2010.
So
how is W_DAY_D populated?
Using the DAC Client
this question is easily answered. There are four tasks that take care of
W_DAY_D.
The main task SIL_DayDimension has
two parameters which are passed to the Informatica workflow.
$$START_DATE has a
default value of 1980-01-01 and $$END_DATE one of 2010-12-31.
Before you can update these
parameters, you have to create a custom container using the functionality in
the DAC File menu. Once the container is created,
Go to the SIL_DayDimension task,
click the Parameters tab and update the parameters according to your needs.


When a referenced object
in the DAC repository is changed, it will be cloned and you have to commit that
in a dialog box.

Now we
have to enforce a full load on the W_DAY_D table, which means setting the
table's refresh date to NULL. This is standard behavior of the DAC. It will
start the task in full mode when the refresh date of the target table(s) are
set to NULL.
To do this, navigate to
Setup > Physical Data Sources > DataWarehouse and click the Refresh Dates
tab. Here you query for the table and set the refresh date to NULL.
Set refresh date for W_DUAL_G,
W_DAY_D, W_WEEK_D, W_MONTH_D, W_QTR_D and W_YEAR_D tables to NULL.

About setting up Gregorian Calendars:
Set calendar type option like 445 or
13 period calendar
Whatever calendar type
you want to deploy, you must set up the start date and
end date range for the Gregorian calendar, I did that.
Note: The
tasks that load the Day dimension will run as part of the Execution Plan for
your Subject Areas. Please note that there are no separate Subject Areas for
common dimensions. They are included in the core Subject Areas.
To set up a 13 Period
calendar:
1.
In
DAC, display the Design view, and select an appropriate adapter.
2.
Display
the Source System Parameters tab.
3.
Set
the value of $$GBL_CALENDAR_ID and $$GBL_DATSOURCE_NUM_ID as follows:
- GBL_CALENDAR_ID: Should be the CALENDAR_ID of the Generated Calendar (4-4-5 or 13 period type of Calendars). By default the 4-4-5 calendar has a CALENDAR_ID of '10000' and the 13-period calendar has a CALENDAR_ID of '10001'.
- GBL_DATASOURCE_NUM_ID: If Global Calendar is Generated Calendar: Should be the DATASOURCE_NUM_ID value of the OLAP (Data warehouse).
4.
Using
a text editor, edit the values in file_mmcal_config_g.csv.
5.
In
DAC, set the value of 13P_CALENDAR_ID to 10001.
Note: The task
SIL_TimeDImension_McalWeek13Period will run as part of the Execution Plan for
your Subject Area. Please note that is no separate subject are for common
dimensions. They are included in the core Subject Areas.
Point:
- By default the 4-4-5 calendar has a CALENDAR_ID of '10000' and the 13-period calendar has a CALENDAR_ID of '10001'.
Click on OK

Click on Yes.

Data Sources and Associated
DATASOURCE_NUM_ID Values

- GBL_DATASOURCE_NUM_ID: If Global Calendar is Generated Calendar: Should be the DATASOURCE_NUM_ID value of the OLAP (Data warehouse).
Click
on OK

Click
on Yes.

Now Configure the
Multi Calendar support
Step1:
Create
custom subject area for multi calendar
Step2:
Add table as W_DAY_D From
table tab from below tab panel:

Step 2 : Select
“Multible Calendar Support “ from below configuration tab:

Assemble
Multi calendar subject area:
Step1:Click
on Assemble tab and ok

Click on Accept button

Click on Continue

Click on OK

Show different support Mappings related to
Multi calendar

Create
Execution Plan for Multi calendar subject area:
Step1:
Create
Execution plan and add multi calendar subject area:

Click on Parameters tabs and click on Generate tab and OK

It show Parameters and click on OK

Change the Values:

Build Execution Plan for click on BUILD button:
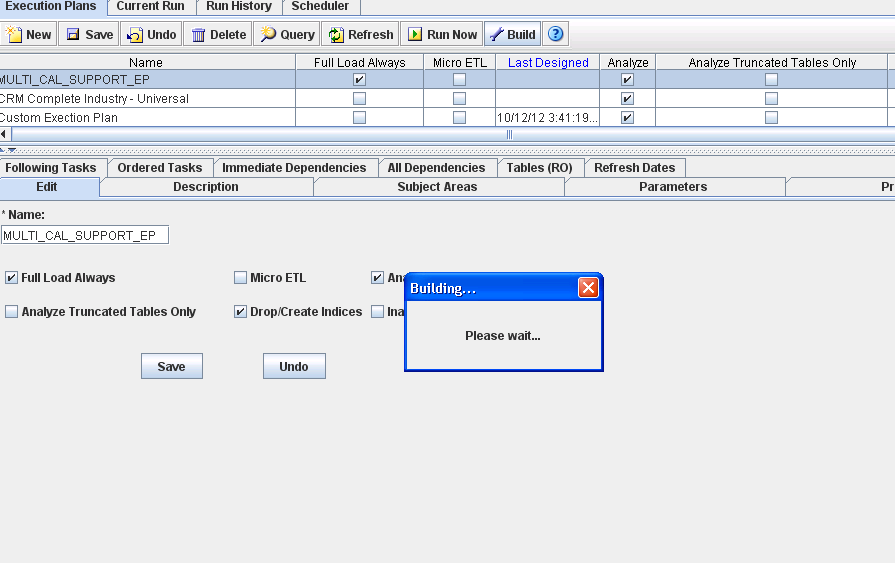
Click on OK

Click on OK

Click on Orders Tasks and It will show Depth:

Click on RUN button and Click on YES

Click on OK

Check the data loaded into W_DAY_D In OBAW

colour of your background makes it hard to read
ReplyDelete